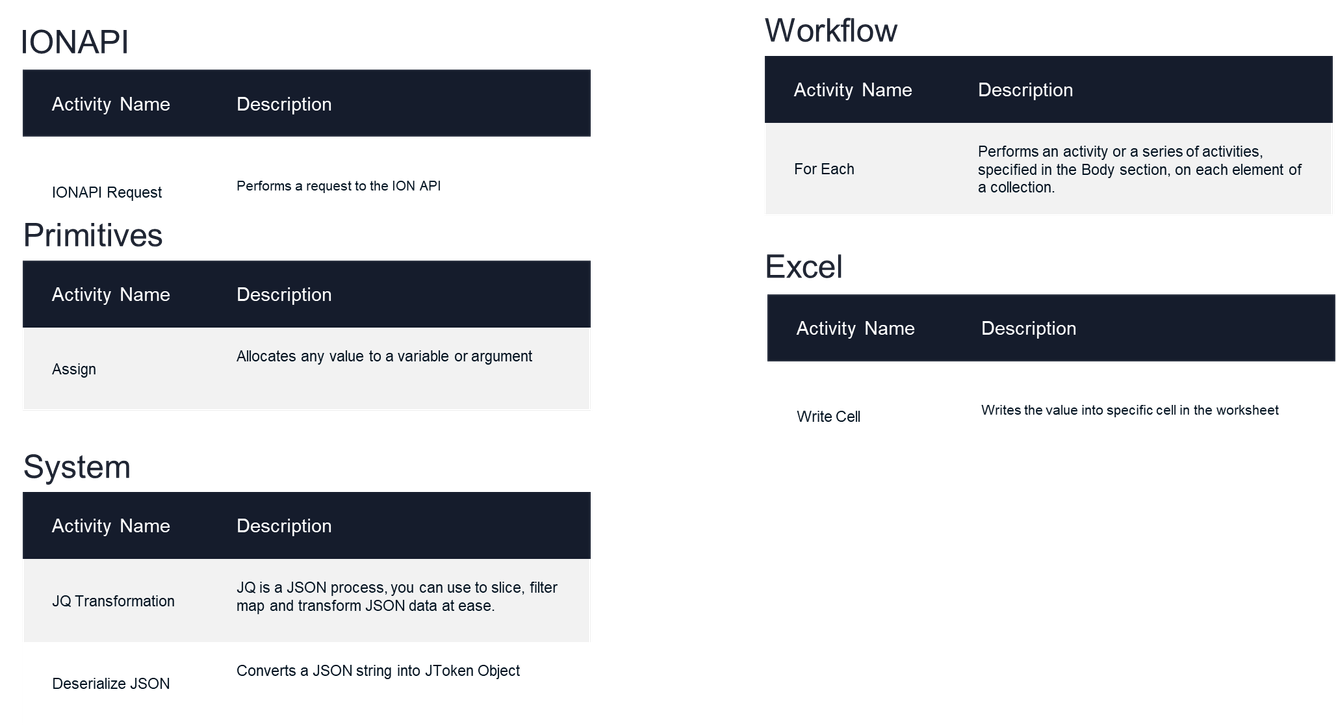
How to create an RPA flow to invoke an ION API endpoint
Business Problem
This tutorial will show you how to create a flow allowing for calling an ION API endpoint to retrieve the list of the applications your user has access to with Infor OS portal and write this list to an excel file. Two flows will be created, first one will be a simple flow allowing to get the list and write it into the Excel file. The second flow iterates through the list and writes each in a row in an excel file.
Components
- RPA Management
- RPA Studio
- Microsoft Excel application
Requirements
- Before you can start building the flow, you’ll need to install the latest version of RPA Studio on your machine and set up a connection between the RPA Studio and RPA Management. Check the Infor RPA Studio User Guide for the steps on how to do it.
- Also, you may need to create the following artifact to set up the RPA flow:
- Create excel spreadsheet path C:\RPA\Test.xlsx
- An extended and a simple list of appilcations can be downloaded below:
Tutorial
Difficulty: Medium
Estimated completion time: 25 Minutes
1 – Open RPA Studio on your machine. If you are not signed in already into the cloud tenant, you would be asked to sign in before proceeding to RPA flow designer screens.
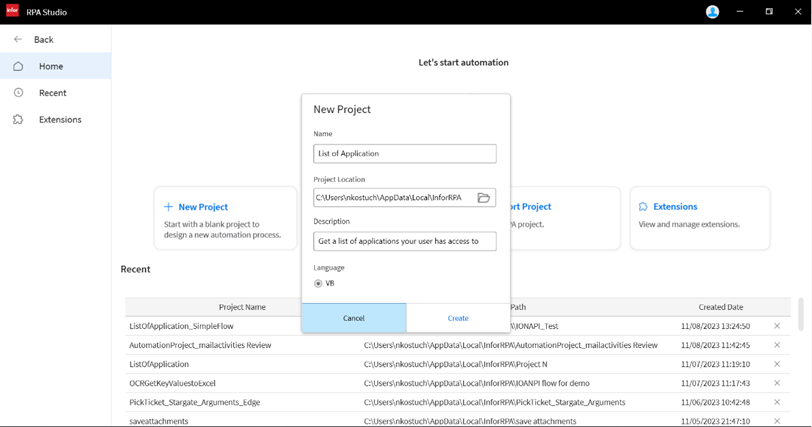
2 – On the Home page of RPA Studio click Create New Project and specify the following properties in the pop-up window:
- Name: List of Application
- ProjectLocation: <default>
- Description: Get a list of application your user has access to
- Language: VB <selected by default>
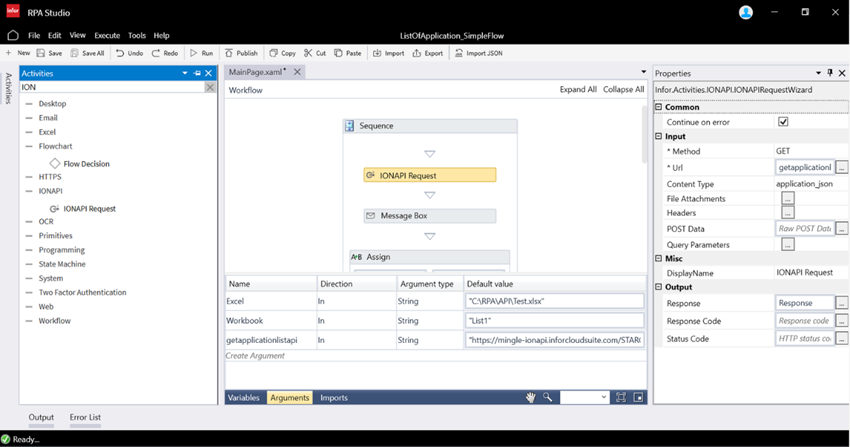
3 – First, we will add the activity IONAPI Request which will allow us to call a particular API Endpoint exposed on API Gateway application part of Infor OS. The activity can be accessed in Activities panel under IONAPI category. Drag and drop the activity on the design canvas and click on it. The properties of the selected activity will appear in the properties panel. Let’s configure its properties in a following way:
- for Method, which is the method of the API Endpoint we will be calling, select GET as the Endpoint we will be calling is of a GET method type.
- for URL, which is the whole URL of the API Endpoint we will be using, let’s create an Argument called getapplicationlistapi of type string and default value for the Endpoint of Infor OS Suite:
- “TenantURL+/OSPORTAL/admin/v1/user/applications” where TenantURL is your CloudSuite tenant URL which typically follows the format: “https://mingle-ionapi.inforcloudsuite.com/TENANTNAME/”
- for Content Type, select application_json
- File Attachment, Headers, POST Data, Query Parameters should stay empty for this particular endpoint.
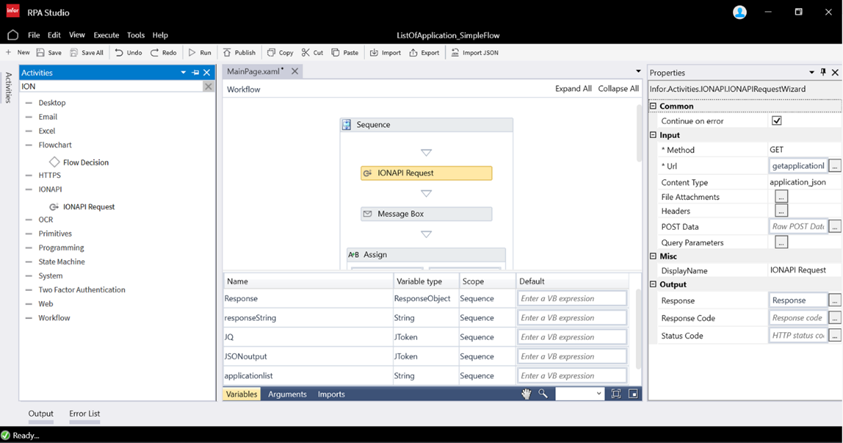
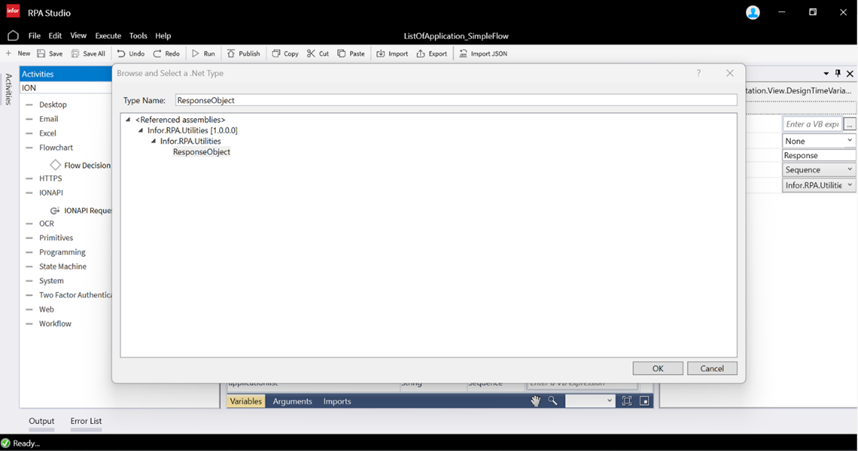
- for Response output property which will hold the API response BOD, let’s create the variable:
- Response of type RequestObject (Infor.RPA.Utilities.ResponseObject)
- to find RequestObject data type expand the Variable Type and select Browse for type. In the Type name cell type RequestObject and select RequestObject under the Infor.RPA.Utilities domain.
- Response of type RequestObject (Infor.RPA.Utilities.ResponseObject)
Note: to use this activity, you should use the endpoint exposed on the tenant you are signed into as part of the RPA Studio session.
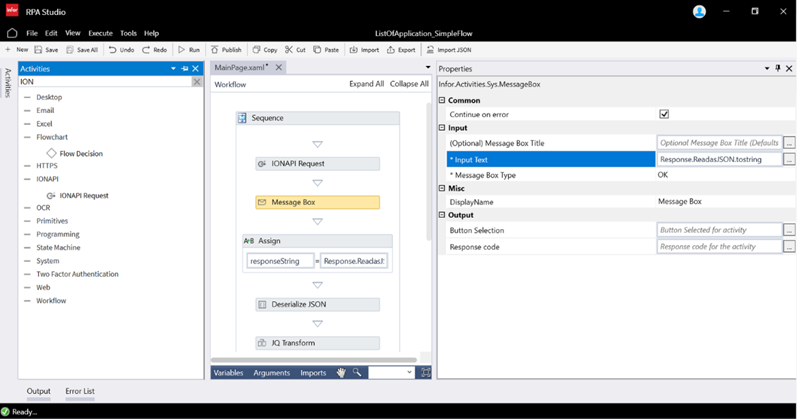
4 – Optional: For troubleshooting, you can add a Message Box activity which would allow you to check the Request body get from calling the API. For that let’s define the following properties:
- for Input Text define the following VB expression Response.ReadasJSON.tostring which allows to read the provided body as JSON and transform it to String data type. It is done because Input Text property allow only values of data type string.
- Message Box Title, Button Selection, Response Code can stay empty.
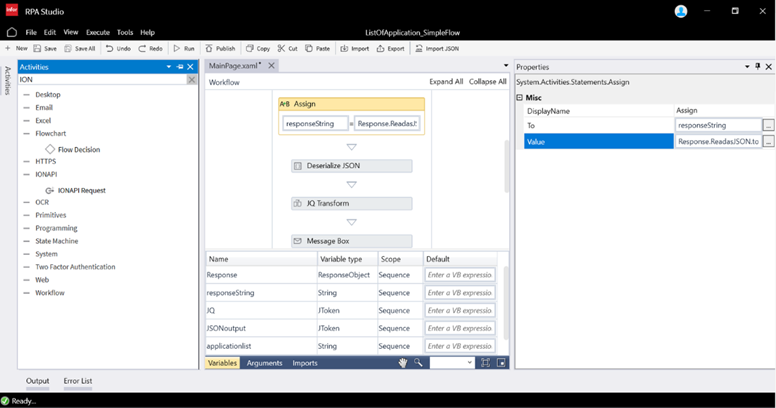
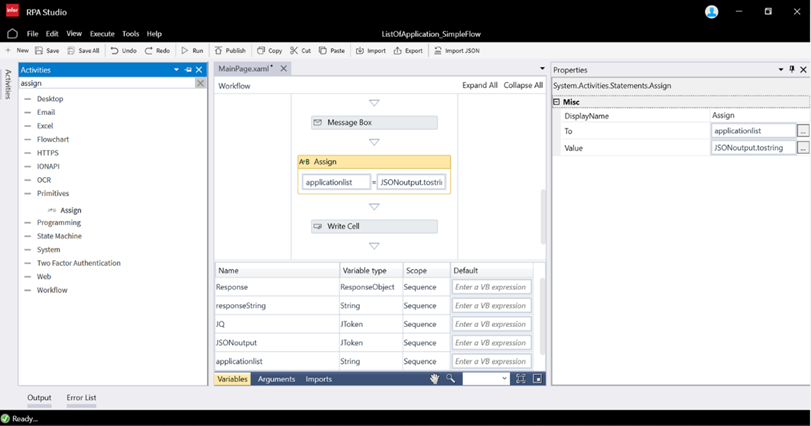
5 – Next, we will create a variable which will be storing the called API response body in the String data type variable. For that let’s add Assign activity and define it properties as followed:
- for To, which is a new variable which will be created and to which we will assign the payloadcreate a variable:
- responseString of type String.
- for Value we will define the same VB expression as we used for the Message Box activity, Input Text property: Response.ReadasJSON.tostring
- On the design canvas as part of this activity you will see the following responseString = Response.ReadasJSON.tostring
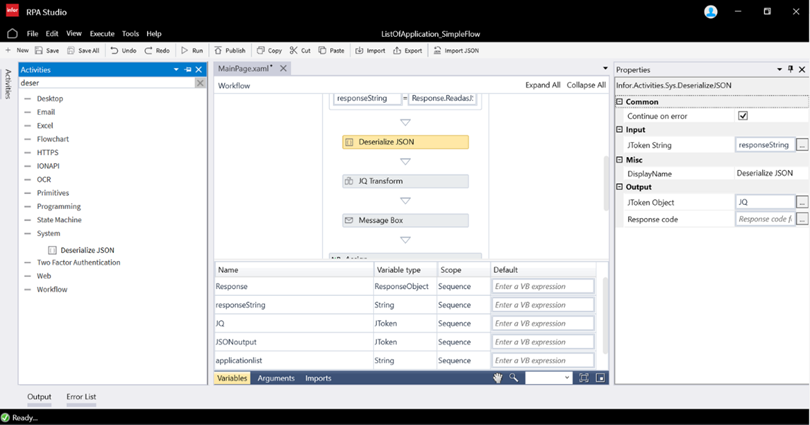
6 – Now we need to transform the received payload so that it changes it type form String into JToken Object. For that we need to use Deserialize JSON activity and define its properties as follows:
- for JToken String, define responseString which is the output variable of previous activity Assign
- for JToken Object, let’s define a variable:
- called JQ of type JToken (Newtonsoft.Json.Linq.Jtoken)
- to find JToken data type expand the Variable Type and select Browse for type. In the Type name cell type JTokenand select JTokenand under the Newtonsoft.Json.Linq domain.
- called JQ of type JToken (Newtonsoft.Json.Linq.Jtoken)
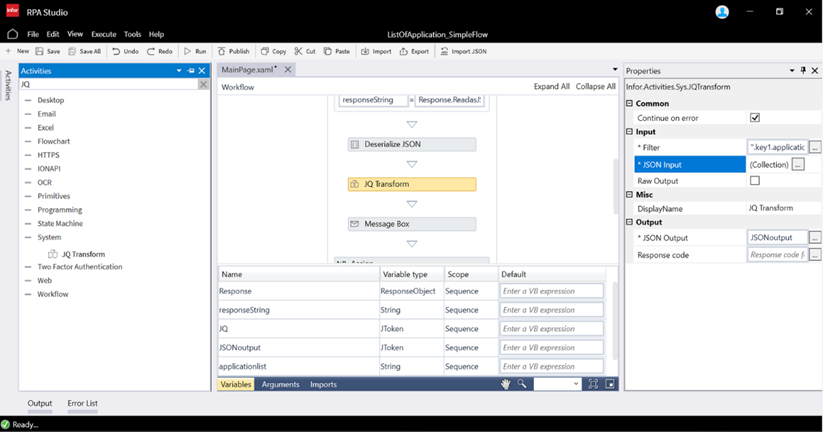
7 – Now it is time to filter out the provided JSON response from API Endpoint to get just the list of the applications which is one of the retrieved properties. For that we will use the activity JQ Transformation and define its properties as followed:
- for JSON Input create a collection of a single iteam key: key1 and value: JQ
- for Filter we need to create a JSON payload filter to get specific value from JSON output – the list of the application. In order to do it you should start from the JSON Input defined key1 following by payload filter which would look like: “.key1.applications[].name”.
- Note: the Filter property data type is string so the provided filter should be within the ““ (quotation mark)
- for JSON Output, which will store the values filtered out from JSON payload, let’s create the variable:
- called JSONoutput of type JToken.
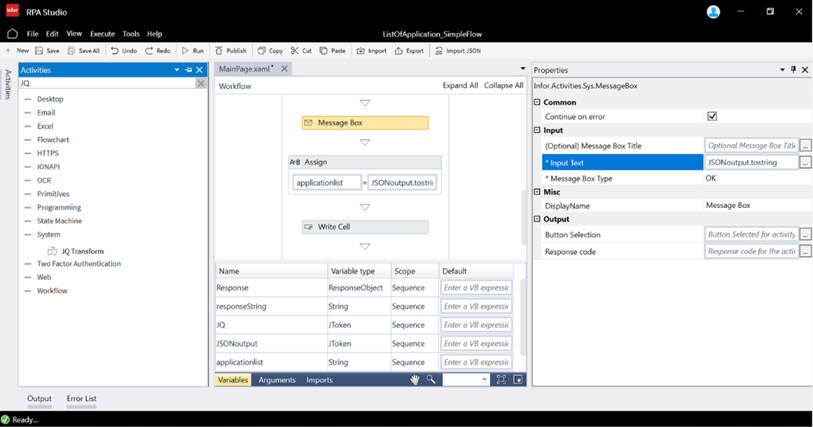
8 – Optional: For troubleshooting, you can add Message Box activity after the JQ Transformation which would allow you to check if we retrieved the desired values from JSON payload. For that let’s define the following properties:
- for Input Text define the following VB expression JSONoutput.tostring which allows to read the provided JSON and transform it to String data type. It is done because the Input Text property allow only values of data type string.
- Message Box Title, Button Selection, Response Code can stay empty.
9 – Next, we need to again transform the received JToken type variable into string data type. For that we will use again the Assign activity and define it properties as followed:
- for To, which is a new variable which will be created and to which we will assign the payloadcreate a variable:
- applicationlist of type String
- for Value we will define the same VB expression as we used for the Message Box activity, Input Text property: JSONoutput.tostring
- On the design canvas as part of this activity you will see the following applicationlist = JSONoutput.tostring
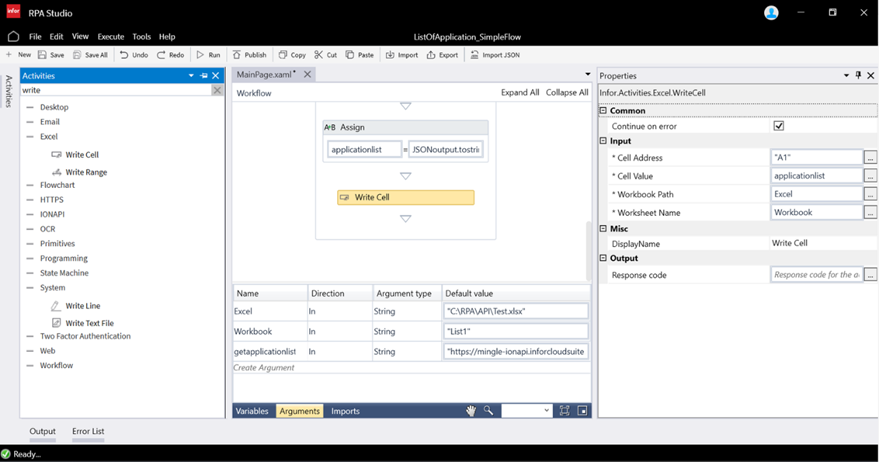
10 – Once we get the values we need from the API Endpoint, we will write the into the .xls spreadsheet. For that, we will use the activity Write Cell part of Excel activities categoryand define the following values:
- for Cell Address provide the exact cell address where the list of the applications can be input, for instance “A1“
- Note: the Cell Address property data type is string so the provided cell address should be within the ““ (quotation mark)
- for Cell Value provide the exact value(s) which should be written into it, specify applicationlist.
- for Workbook, which is the exact .xls file where the values will be written specify the following argument:
- called Excel of type string and default value with .xlsx workbook created as part of the pre-requisites “C:\RPA\Test.xlsx “
- for Worksheet Name, which is the name of the workbook within the .xlsx file, for that let’s create the argument:
- called Workbook of type string and default value e.g. “List1“
- Note: the exact name of the workbook of the part of the .xlsx file create, the workbook default name maybe different depending on the used language on your working station.
- called Workbook of type string and default value e.g. “List1“
The flow will write all the applications names your user has access to into a single cell. To input them into the columns, you would need to first split the values into columns. Next, copy all the cells’ columns and paste as transpose.
Flow Improvements:
Now you can improve the flow, by adding few activities in order to put each of the retrieved application into a different row in a single columns. For that let’s follow the below steps:
1 – After the Deserialized JSON, remove JQ Transformation, and in its place, add the Assign activity and specify the following values:
- for To define the varibale JSONoutput already defined in the variable list as part of the previous flow.
- for Value we will define the same VB expression to get the array of values under the application property JQ(“applications“).
- On the deign canvas as part of this activity you will see the following JSONoutput = JQ(“applications“).
2 – The Message Box activity can stay as it was so that we can see if we got the JSON Array with list of application and additional values.
3 – The activities after the Message Box can be removed as well: Assign and Write Cell. Or you can live them and move as part of the While look you would be asked to add later and change the properties.
4 – Next, we need to specify the variable for which we would count the number of the object within the retrieved array. For that adde For Each activity and specify the following values:
- for TypeArgument select the data type corresponding to the object JToken (Newtonsoft.Json.Linq.Jtoken), use Browse for type option to find this data type
- for Value define the JSONoutput which is the output from the previous activity
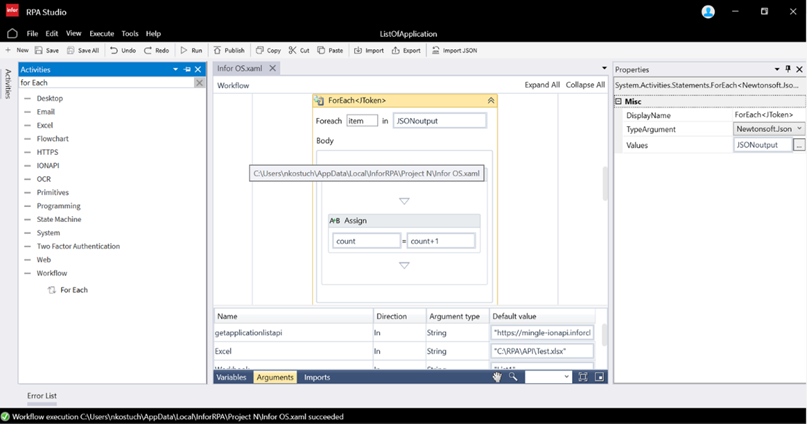
5 – Inside of the For Each activity body add Assign activity and specify the following values:
- for To, define the variable:
- called count of type int32.
- for Value, define the following VB expression count + 1:
- this logic will allow us to count all application within the retrieved payload the user has access to.

6 – Optional: For troubleshooting, you can add Message Box activity after the For Each which would allow you to check how many applications are listed in the payload
- for Input Text define the following VB expression count.tostring which transform the count variable into String data type. It is done because Input Text property allow only values of data type string.
- Message Box Title, Button Selection, Response Code can stay empty.
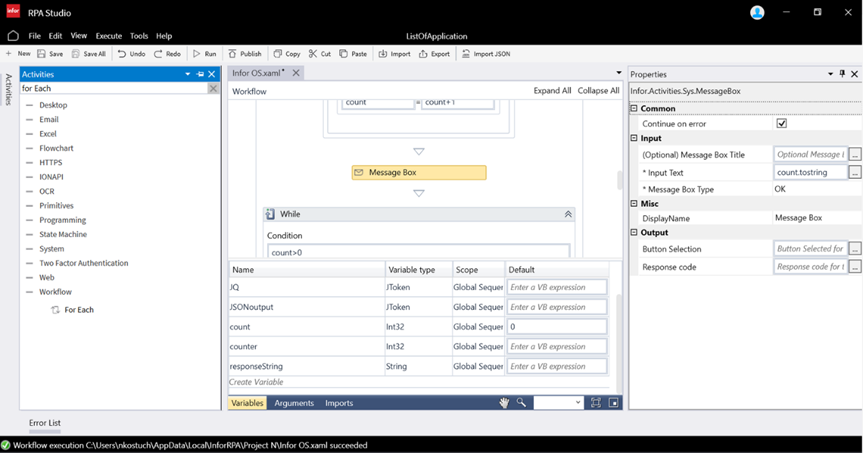
7 – Next, we will create a While loop to help us write the values one by one until the array finished and write the values into the Excel Workbook. For that less add While activity and define:
- Condition count > 0, it allows us to run the loop until the count is more than 0.

8 – Next, add the Sequence, and within it, add the JQ Transformation activity to get a single application name from the payload. It will be configured in a similar way as in the first basic flow:
- for JSON Input create a collection of a single iteam key: key1 and value: JQ
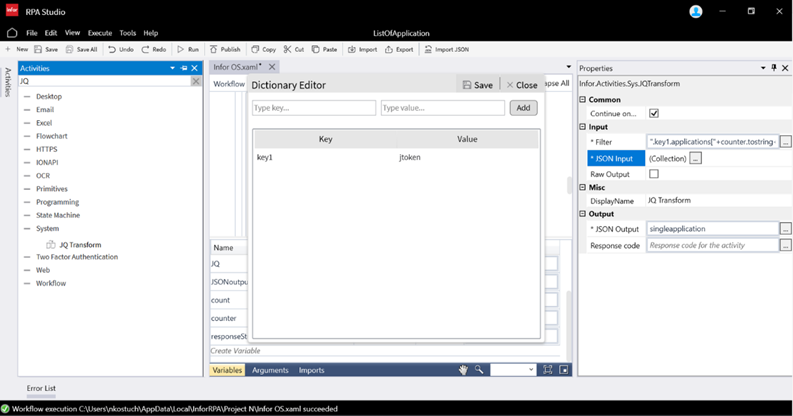
- for Filter we need to create a JSON payload filter in order to get specific value from JSON output – the list of the application. In order to do it you should start from the JSON Input defined key1 following by payload filter which would look like: “.key1.applications[“+counter.tostring+”].name”.
- for counter create the varibable counter of type Int32
- +counter.tostring+ – allow us to insert the counter value so that a specific object name key value from an array is retrieved
- Note: the Filter property data type is string so the provided filter should be within the ““ (quotation mark)
- for JSON Output, which will store the values filtered out from JSON payload, let’s create the variable
- called singleapplication of type JToken
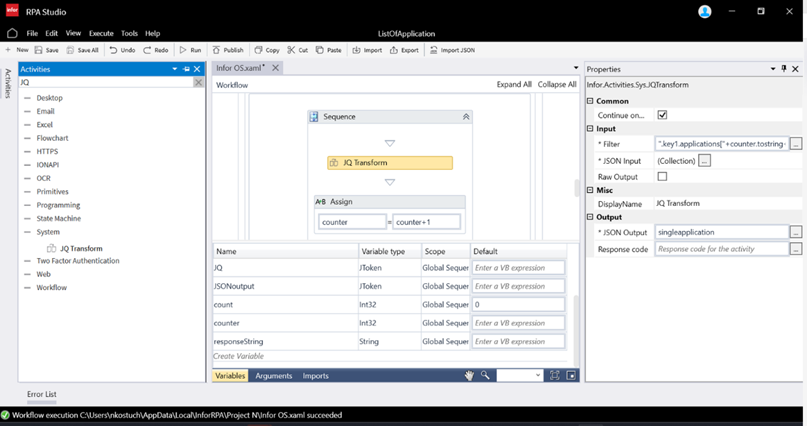
9 – Next add the Assign activity which would allow us to create a counter which after each interaction will be increased by 1. For that defined the following:
- for To define counter variable
- for Value define counter + 1

10 – Next add again the Assign activity which would allow change the application variable of type JToken into string. For that defined the following:
- for To create the variable:
- application of type string
- for Value define singleapplication.tostring where singleapplication is the variable output from JQ Transformation activity
11 – Now we can start writing the retrieved application name into Spreadsheet by adding Write Cell activity and define the following properties:
- for Cell Address provide the exact cell address where the list of the applications can be input “A”+counter.tostring
- Where counter.tostring is the number of the sell where we will write a single application name
- Note: the Cell Address property data type is string so the provided cell address should be within the ““ (quotation mark)
- for Cell Value provide the exact value(s) which should be written into it, specify application
- for Workbook Path, which is the exact .xls file where the values will be written specify the following argument:
- called Excel of type string and default value with .xlsx workbook created as part of the pre-requisits “C:\RPA\Test.xlsx “
- for Worksheet Name, which is the name of the workbook within the .xlsx file, for that let’s create the argument:
- called Workbook of type string and default value e.g. “List1“
- Note: user the exact name of the workbook of the part of the .xlsx file create, the workbook default name maybe different depending on the used language on your working station.
- called Workbook of type string and default value e.g. “List1“
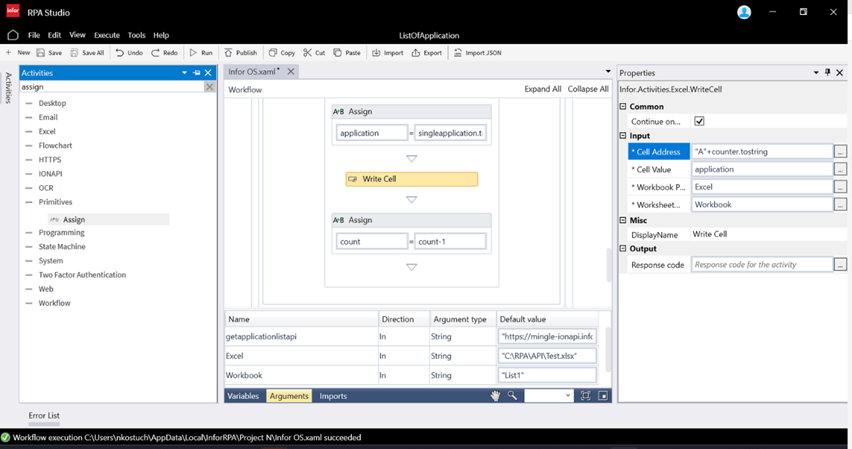
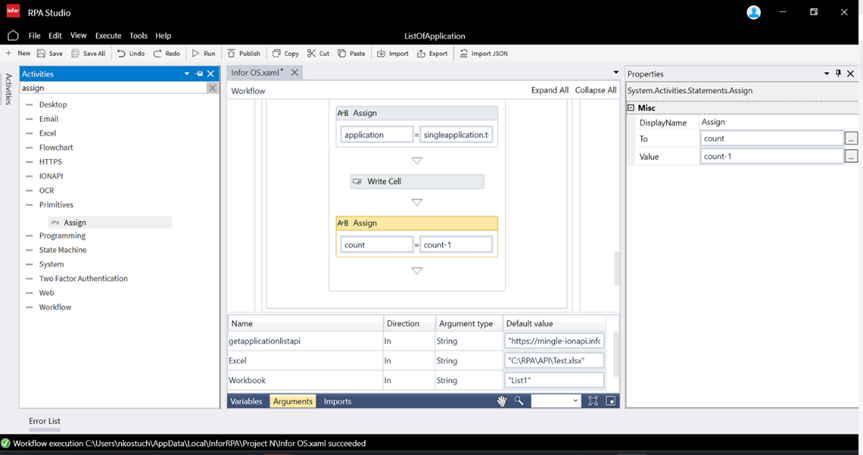
12 – Once the write to cell action happens we would need to decrease the count. For that let’s add Assign activity again. For that defined the following:
- for To define count variable
- for Value define counter – 1
Now you can test the flow and see if it allows you to write the each of the application name to a different cell and you are able to see the payloads in the Message Box.
Note: Before you publish the flow, it is recommended to remove the Message Box activities.
Activities List