Ingest Excel files into the Data Lake
Overview
While most of the transactional data might come from Infor applications or 3rd party applications from public/hybrid cloud, there are still systems that generate data in Excel formats. This format is great for human consumption but is generally not ideal for systems to read and process.
Being able to schedule and automate the import of Excel files into the Infor Data Lake can help complement your enterprise data and allow you to operationalize custom data models to unlock valuable insights.
Components
Requirements
- Access to an Infor CloudSuite
- User privileges to ION Desk (IONDeskAdmin) and Data Fabric (DATAFABRIC-SuperAdmin)
- Access to a file server
- Optional Infor U Campus courses:
- Infor OS: Foundation for Multi-Tenant – Part 1
- Infor OS: Foundation for Multi-Tenant – Part 2
- Infor OS: Configuring ION Connect
Tutorial
Difficulty: Medium
Estimated Completion Time: 45 minutes
The Infor Data Lake uses object storage, making it capable of storing files, or “data objects”, of virtually any data format. Data objects are eligible to be queried only if they conform to one of the recognized formats, which include NDJSON and DSV(CSV, TSV, PSV, or user-defined).
This tutorial walks through the process of automating ingesting Excel files through the ION sFTP File Connector, leverage the ION Scripting capabilities to automatically convert the file format from Excel to CSV, ingest the resulting object into Data Lake, and finally use it to build a comprehensive business domain model using Metagraph.
1. Sample dataset used for the tutorial:
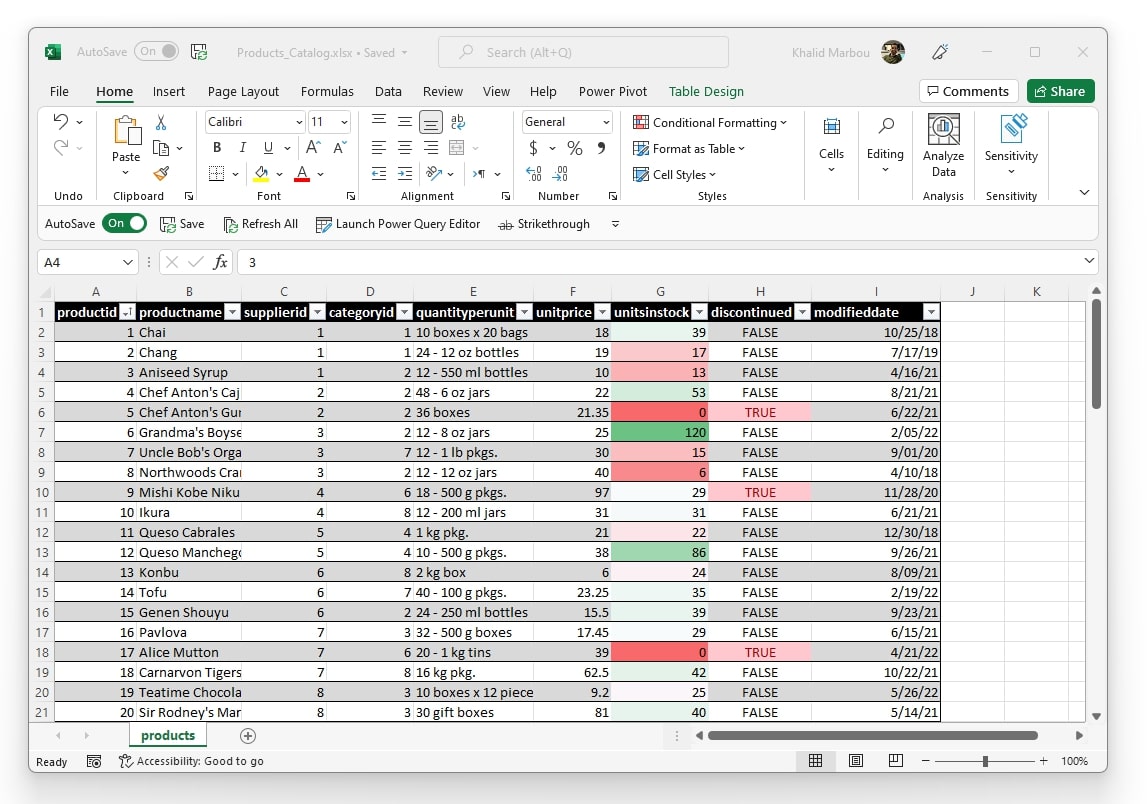
For this tutorial, we’re using an example data set containing a product catalog which is generated on-premise as an Excel file that is updated regularly with information about products including addition of new items, updating product attributes and/or discontinuing existing items.
Here is what the data file looks like:
- The full dataset can be downloaded here:
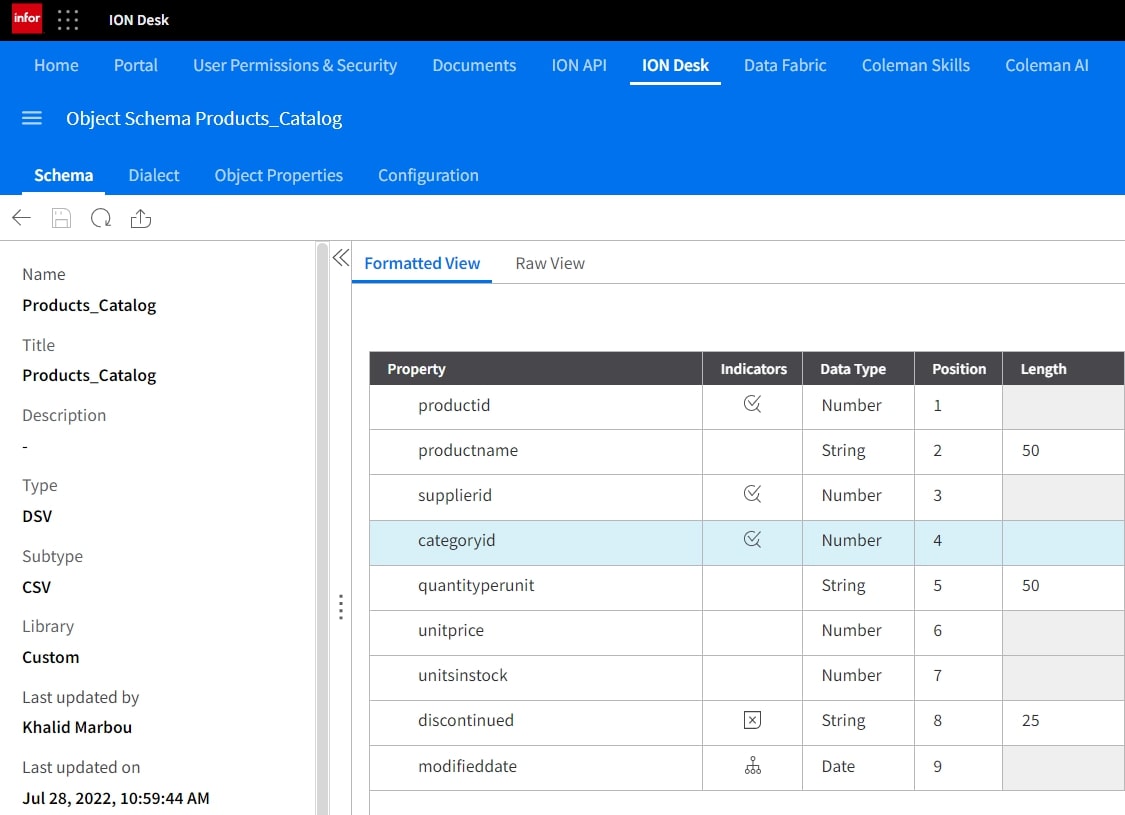
2. Register object schemas in Data Catalog:
Before we begin, any files/objects used either as part of an integration workflow in ION or being ingested into the Data Lake must be assigned a metadata definition called Object Schema in the Data Catalog.
Let’s first begin by defining the Excel file format. Since Excel is not a supported object type for either processing or querying within Data Lake, it can simply be registered under the blanket category of “ANY”.
Since we are using a workflow to convert Excel files into CSVs for ingestion in Data Lake, the CSV output must also be given an appropriate Object Schema definition.
A quick way to do this is through the use of the Data Catalog Schema Wizard, which streamlines the process of creating schemas by looking at sample data sets and inferring data types and properties.
Since the wizard only works with objects supported for query and exploration in Data Lake, namely NDJSON and DSVs (CSV, TSV, PSV, or user defined), a CSV export of the spreadsheet can be used for the process. This can be done through Excel > Save As > CSV (UTF-8). Or you can simply use the provided sample file here:
Refer to this video to see how you can use the Data Catalog wizard:
The Object Schema should look like this:
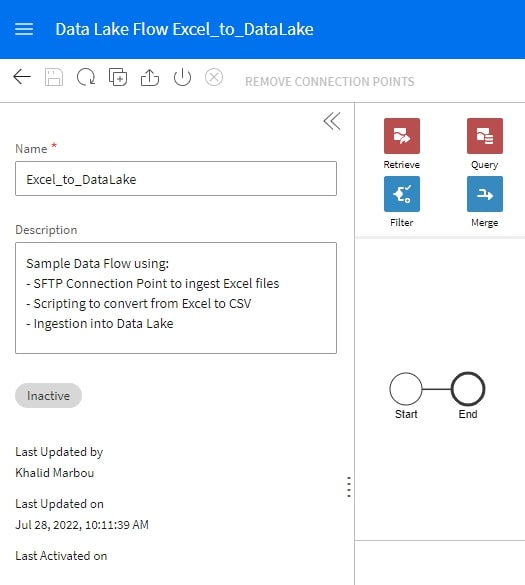
3. Create a Data Lake Flow in ION:
Now that we have the metadata objects defined, we can start building the integration workflow that would take the Excel file from the sFTP server location, convert it into a CSV file and then ingest in Data Lake.
We always recommend giving your workflow a context by taking advantage of the description box provided:
4. Add and configure the sFTP connection point:
Next we’ll proceed to add the first step in the flow which is to retrieve the Excel file form the SFTP server. From within the modeler, we can navigate to create and configure a connection point for our sFTP server.
Once the connection point is setup, we can test it to ensure that it is configured correctly.
Next, we’ll need to configure the Documents menu in our sFTP connection point to specify the file being retrieved and tie it back to the “ANY” Object Schema we defined earlier for our Excel file.
Below is a sample setup that specified the file name pattern as *.xlsx, this can be made more specific by using a specific naming pattern. We can also specify folders where the files are read from (Read Location), moved to after successful processing (Archive Location) or in the event of unsuccessful processing (Error Location).
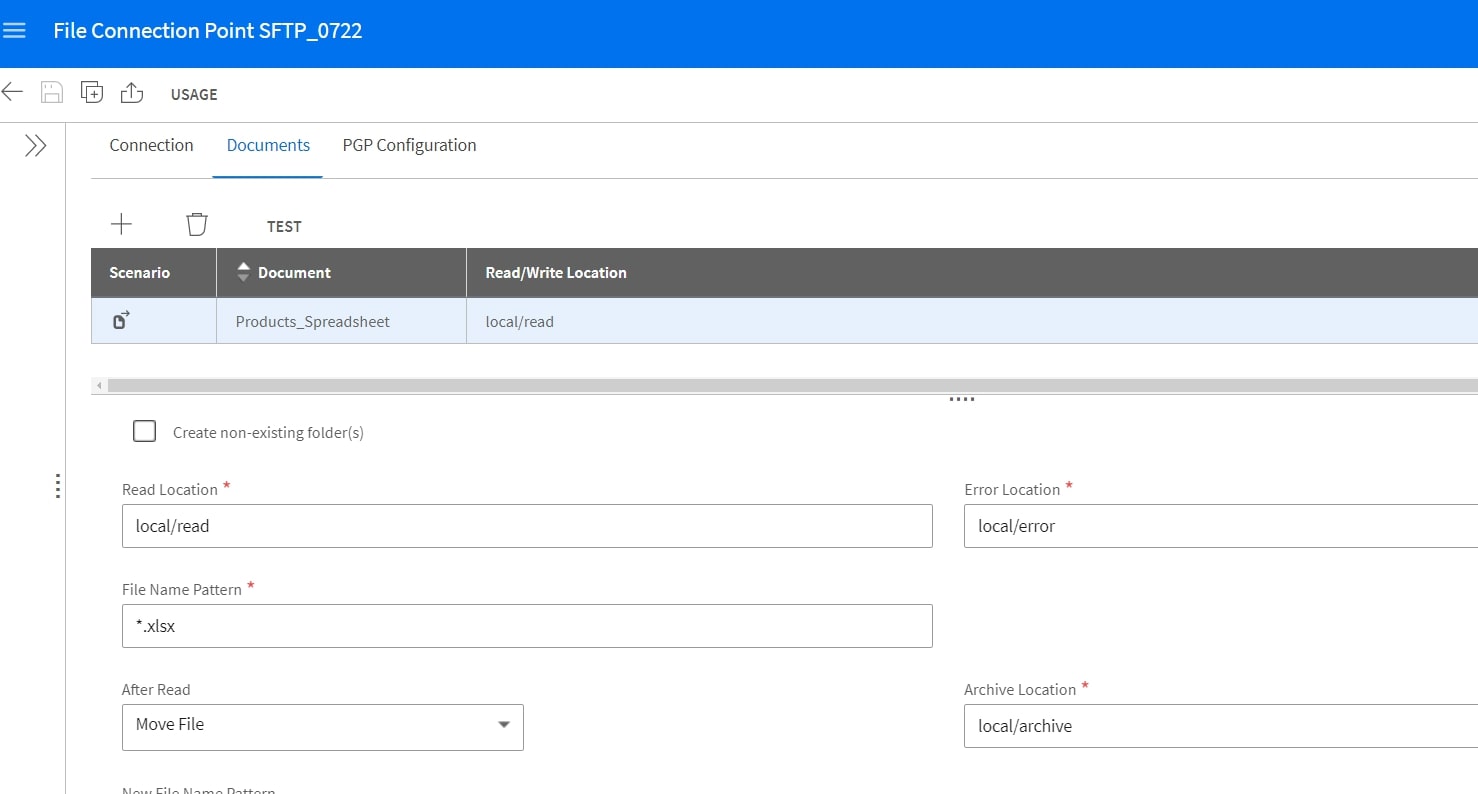
We recommend performing a quick test to make sure the connection point is able to access the specified folders to retrieve files.
5. Define the transacted document:
With the connection point configured and tested, we can go back to editing the Data Lake flow. You’ll notice that a Data Lake ingestion component is automatically added into the flow as Data Lake flow.
However, we are not ready yet to ingest the object as we’d like to process it into a queryable CSV object first. For that, we’ll need to add a scripting step.
6. Add and setup the ION Scripting step:
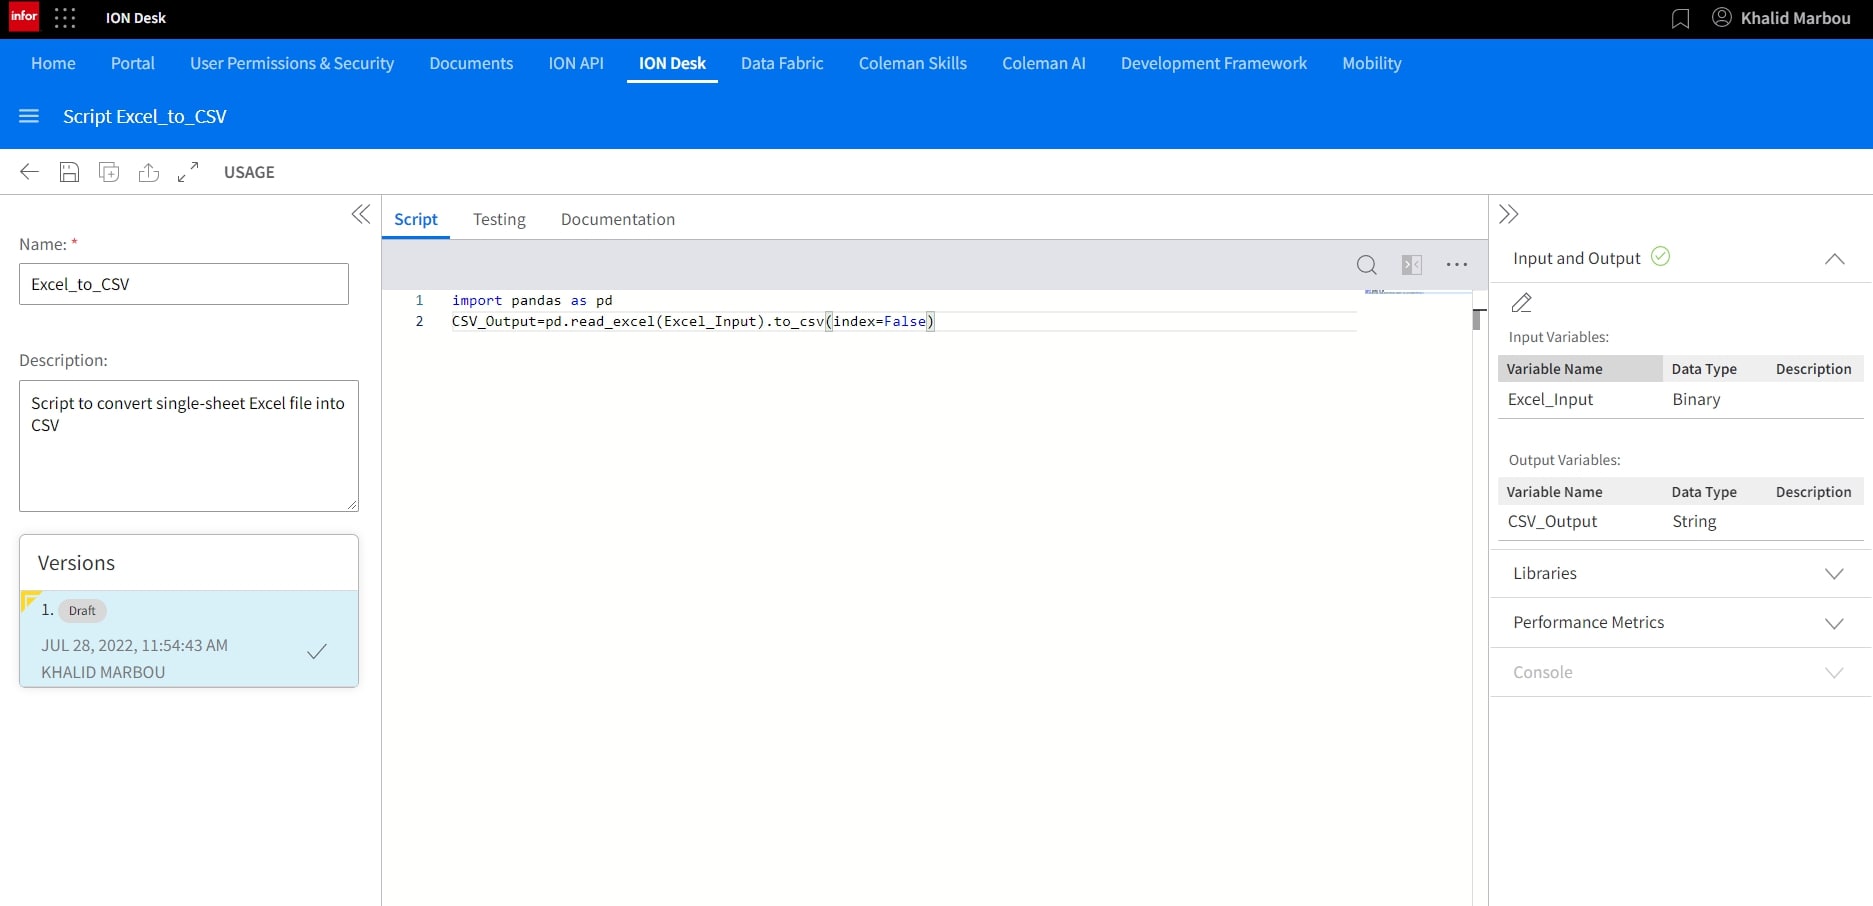
Since we’re using a simple Excel file with a single sheet, we can build a short and simple Python script to achieve this outcome. A sample code is included below for use.
import pandas as pd
CSV_Output=pd.read_excel(Excel_Input).to_csv(index=False)
Inputs and Outputs need to be configured as well, with the input being a binary type (the Excel file), and output as a string which is the CSV data being written into the pre-defined CSV Data Object Schema.
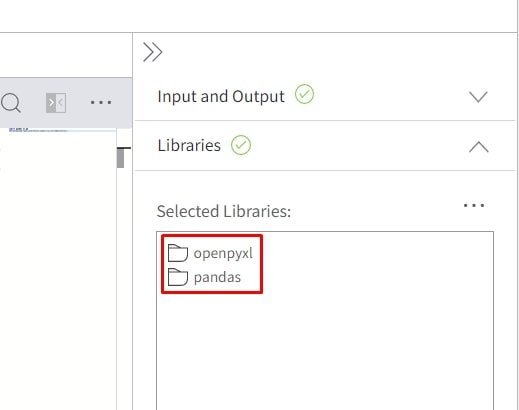
As our code uses the Pandas library but also have a dependency on the Openpyxl library, we’ll need to add both under Libraries.
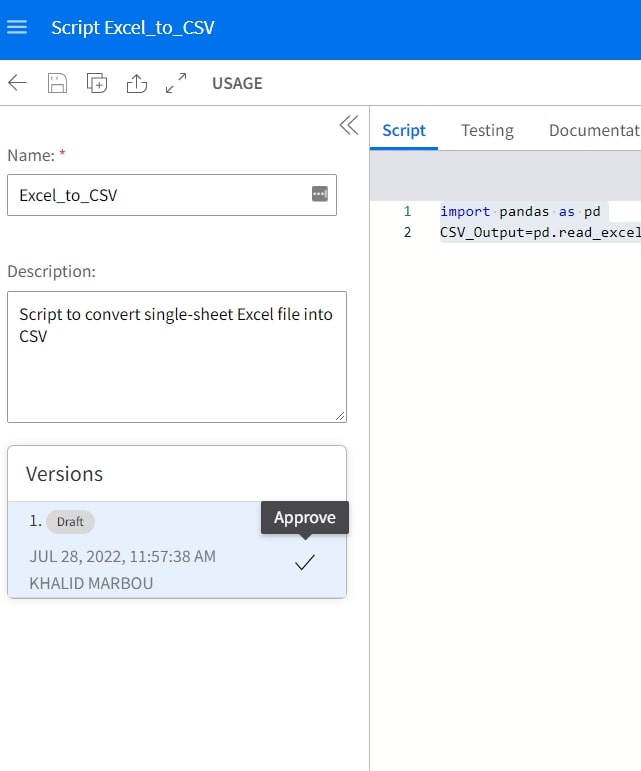
With our script configured, we can proceed to perform a quick test to ensure it’s working as intended.
Once the code is tested and validated, the final step is to operationalize it by officially Approving it.
7. Configure the Scripting step:
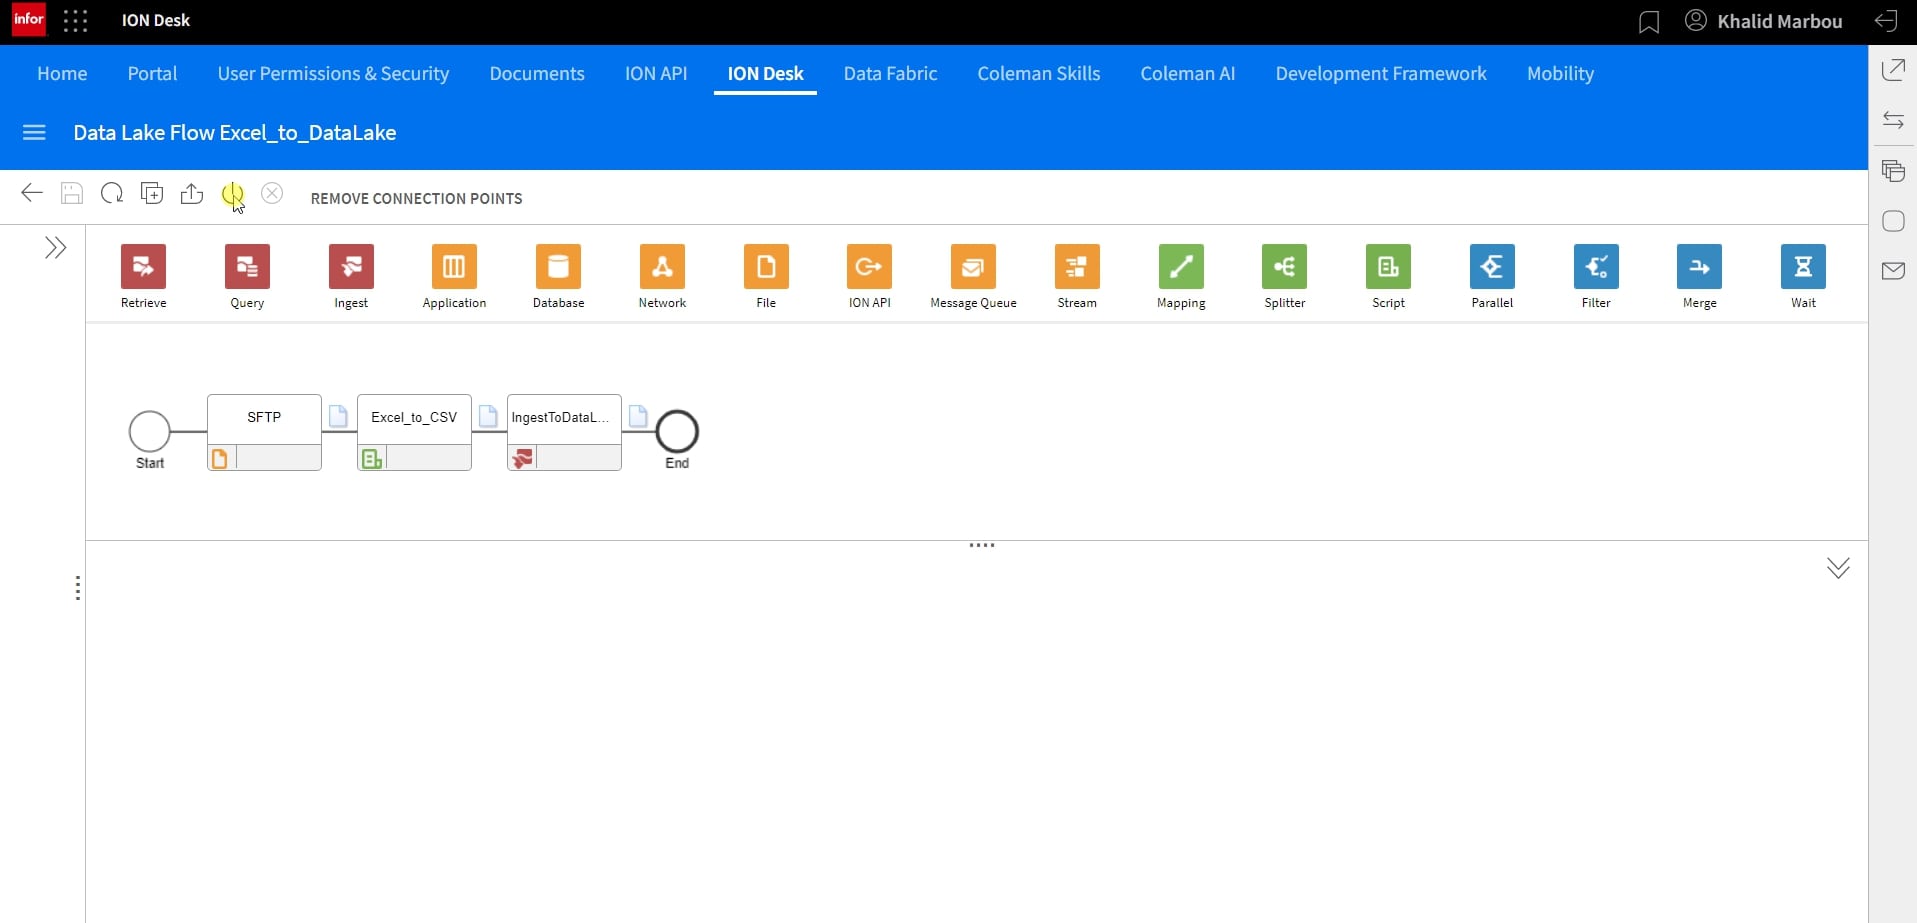
Back at the Data Lake flow, we now have a three step process that starts with the sFTP connection point, goes through scripting, and ends with ingestion to Data Lake.
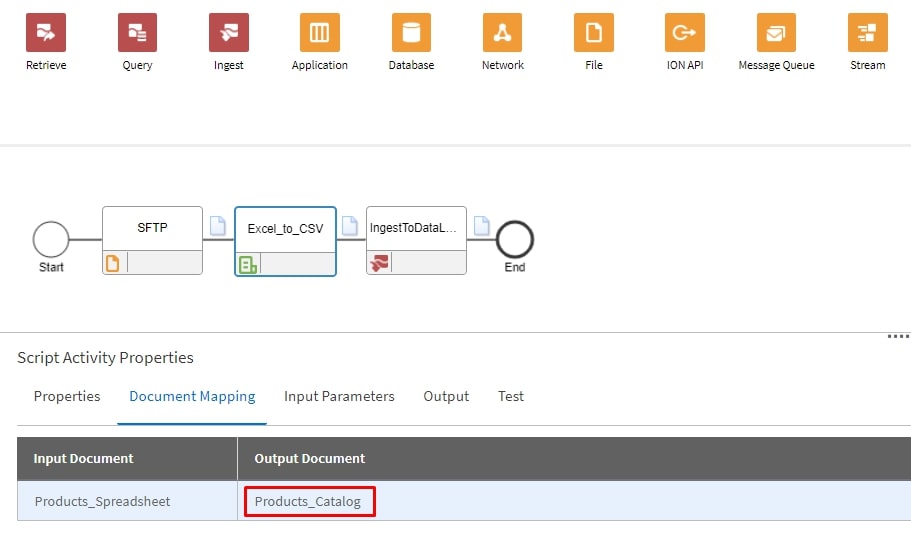
Let’s make sure our scripting step is configured correctly starting with the Document Mapping tab:
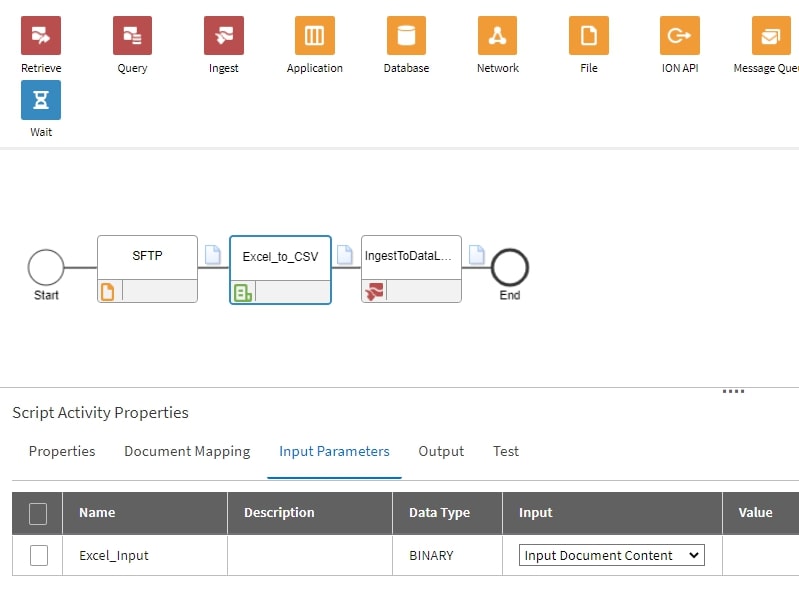
Also making sure that the Input parameters are defined correctly:
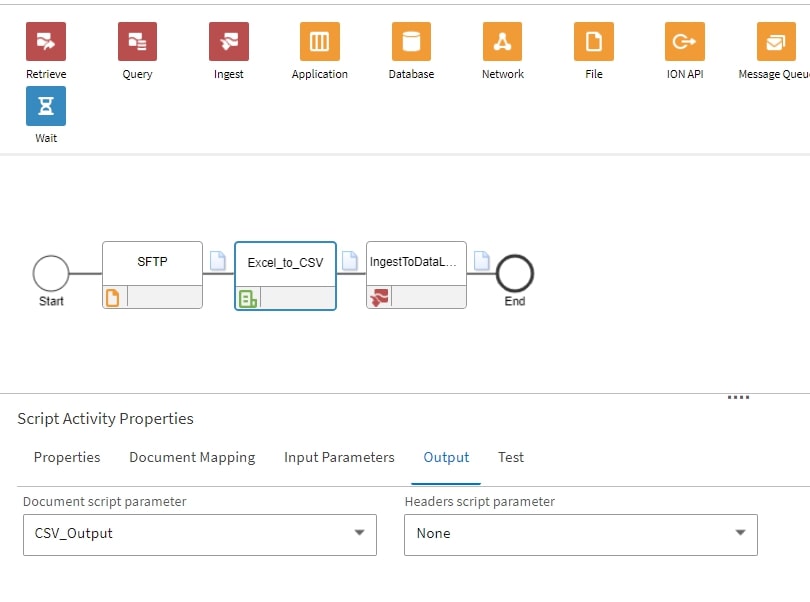
And finally, that the Output is also configured correctly:
8. Activate and monitor the Data Lake Flow:
Now that we have our Data Flow fully configured and tested, we can proceed to Activate it.
Under OneView, we can track the full progress of this workflow by filtering for the specific documents that we’re tracking to see the latest transactions.
As you can see here, we see that our Excel file was first picked up and sent to ION scripting as a first step.
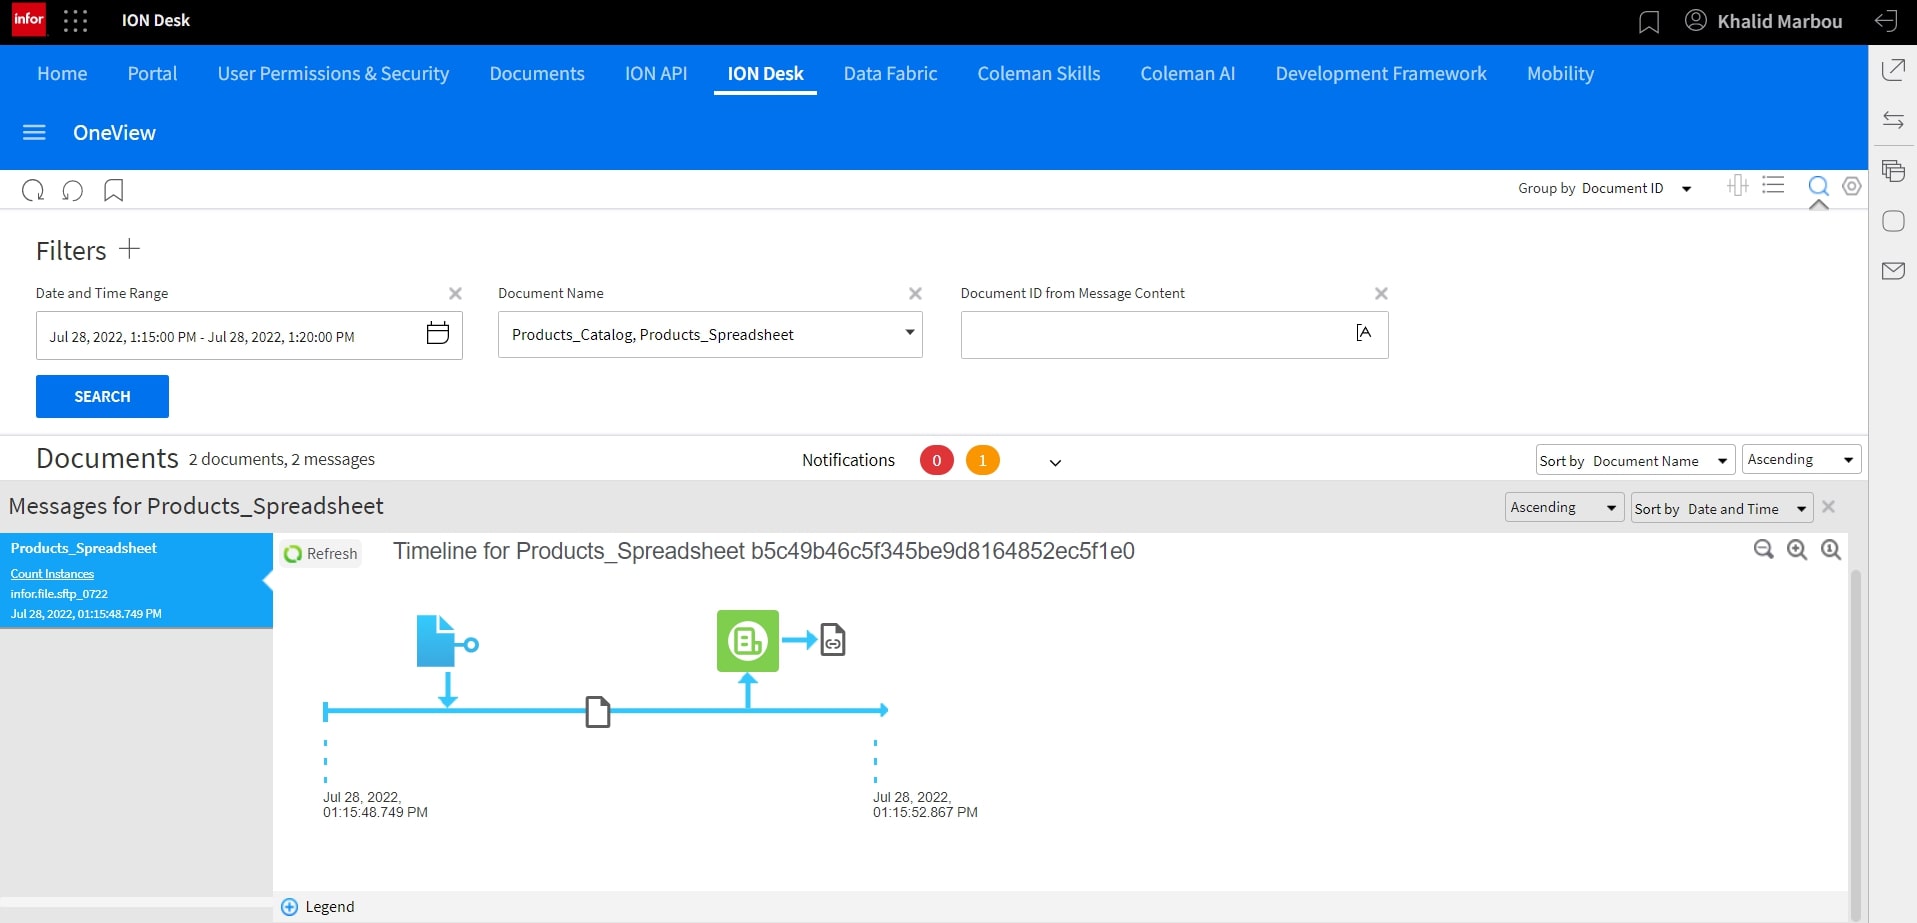
As the output of Scripting is a new document type, we’ll click on that document to see the progress from then on.
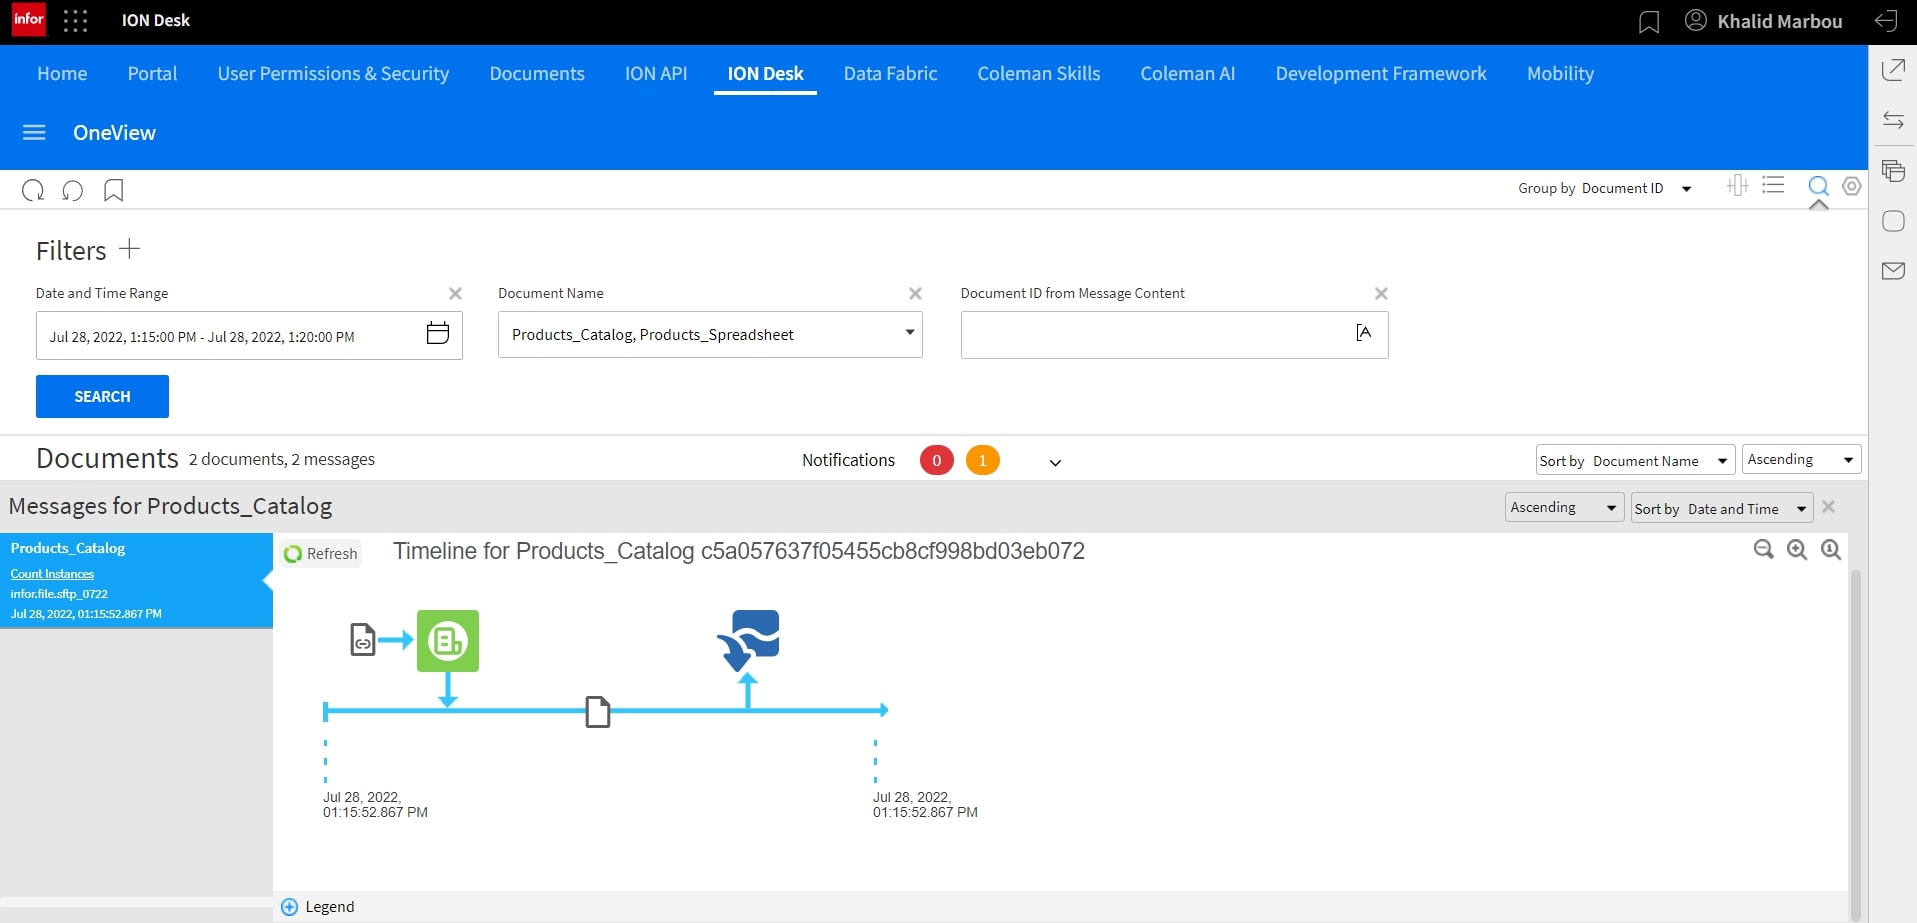
It looks like our data was successfully ingested in Data Lake.
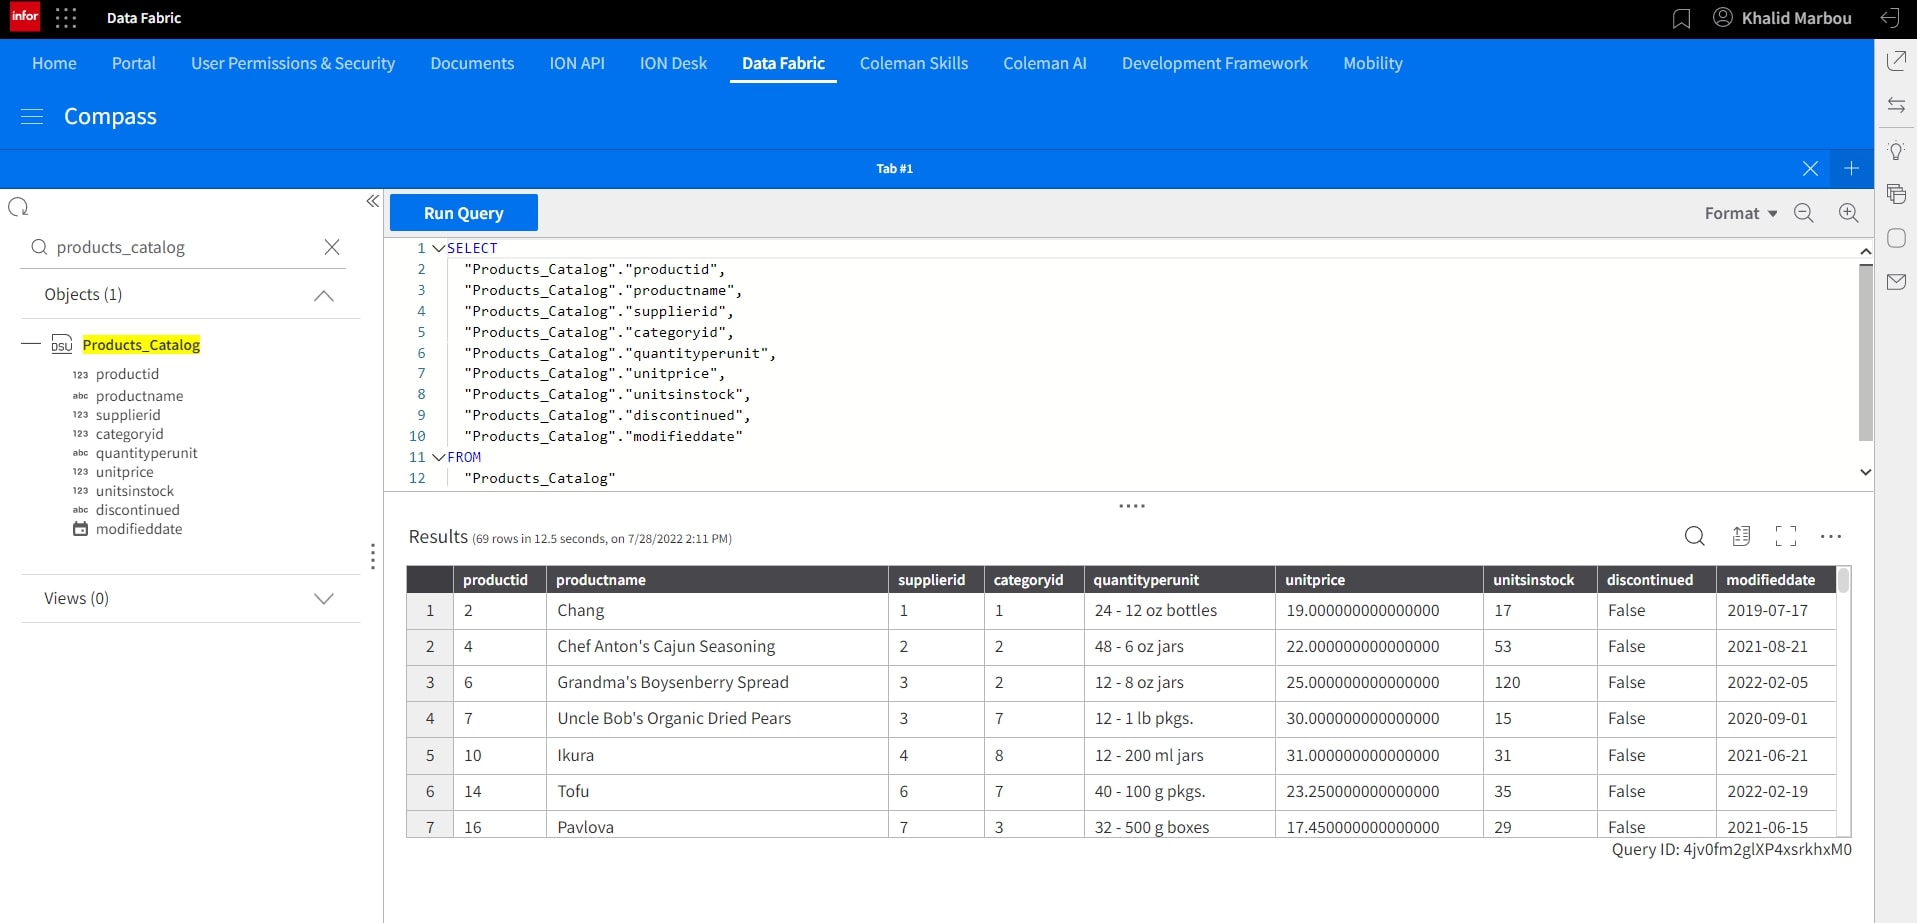
9. Explore and query the ingested data:
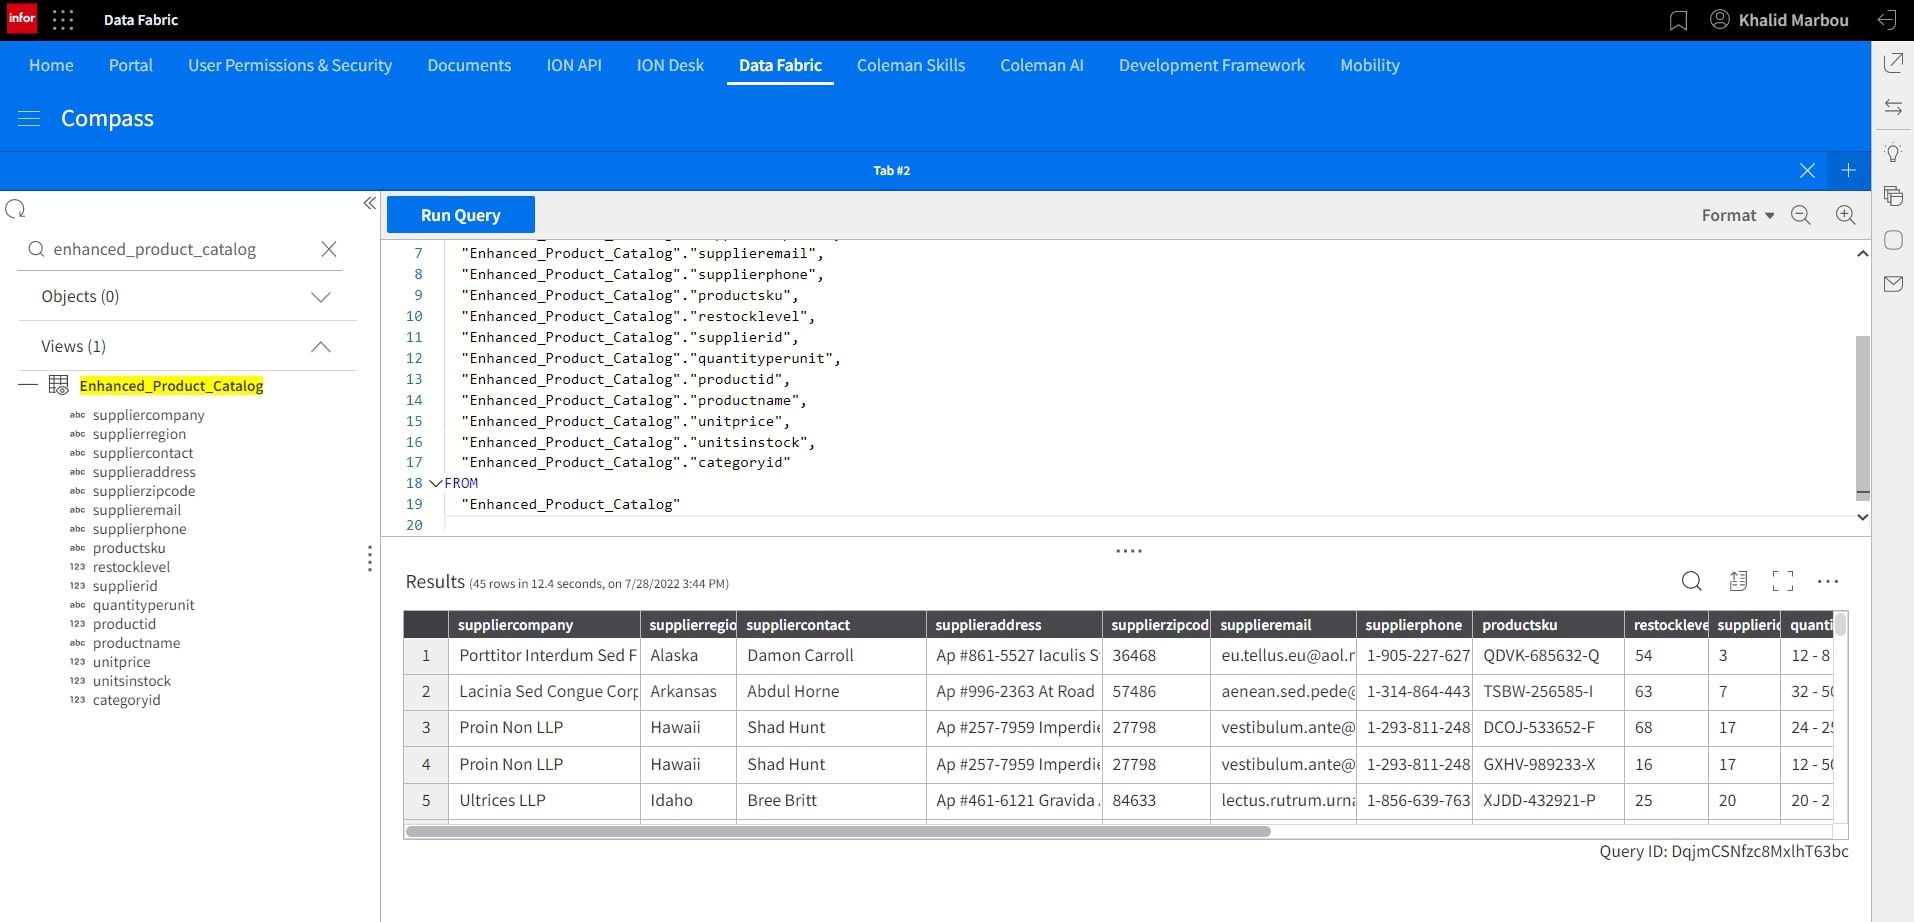
Let’s navigate to Data Lake to explore the object that was just ingested under Atlas.
We can also run a simple SELECT query against the object to preview the sample data set.
10. Build and configure a Metagraph to give the ingested data a business context:
With our data ingestion and processing process fully automated, we can now start thinking about how to operationalize the data set and connect with existing objects in Data Lake to build a context-aware metadata business model using Metagraphs.
Let’s start by creating a new Metagraph.
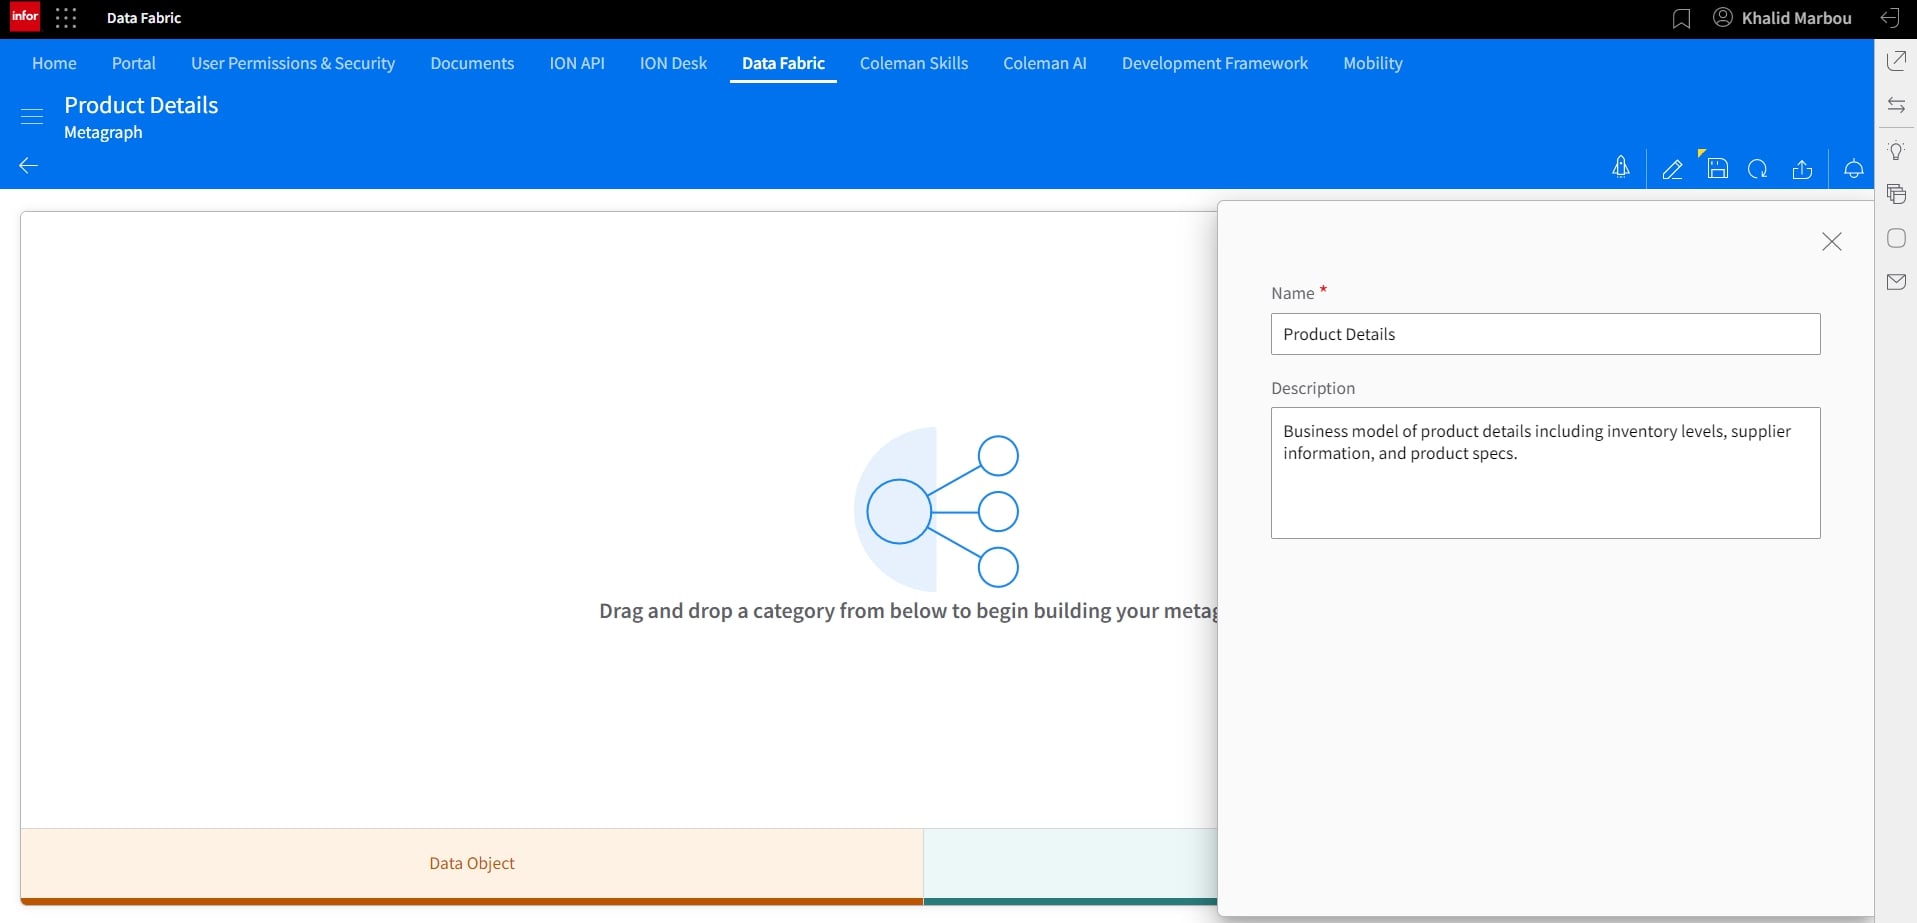
Let’s add our first node, which by default becomes the primary node. This however can be changed manually later if needed.
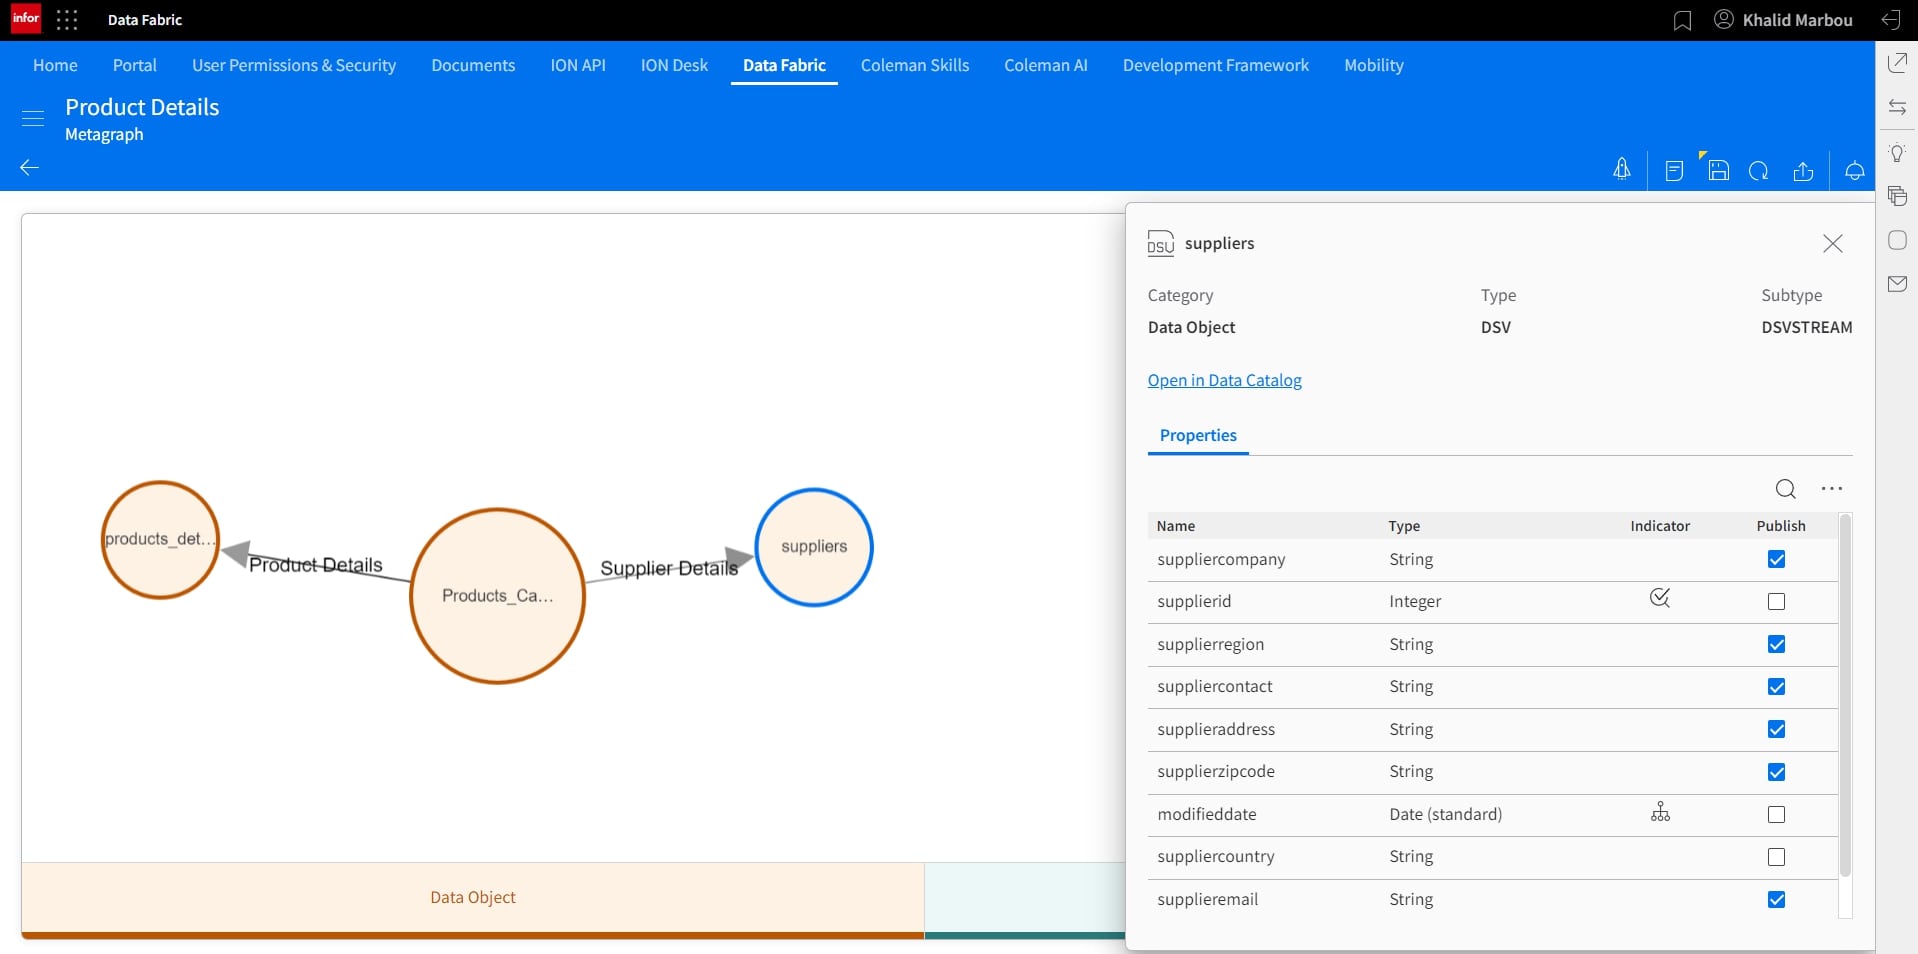
Other nodes can be added similarly. In this case, we’ll connect our newly added Products Catalog object to existing tables containing information about Suppliers and further details about products, including re-stock levels, and SKU.
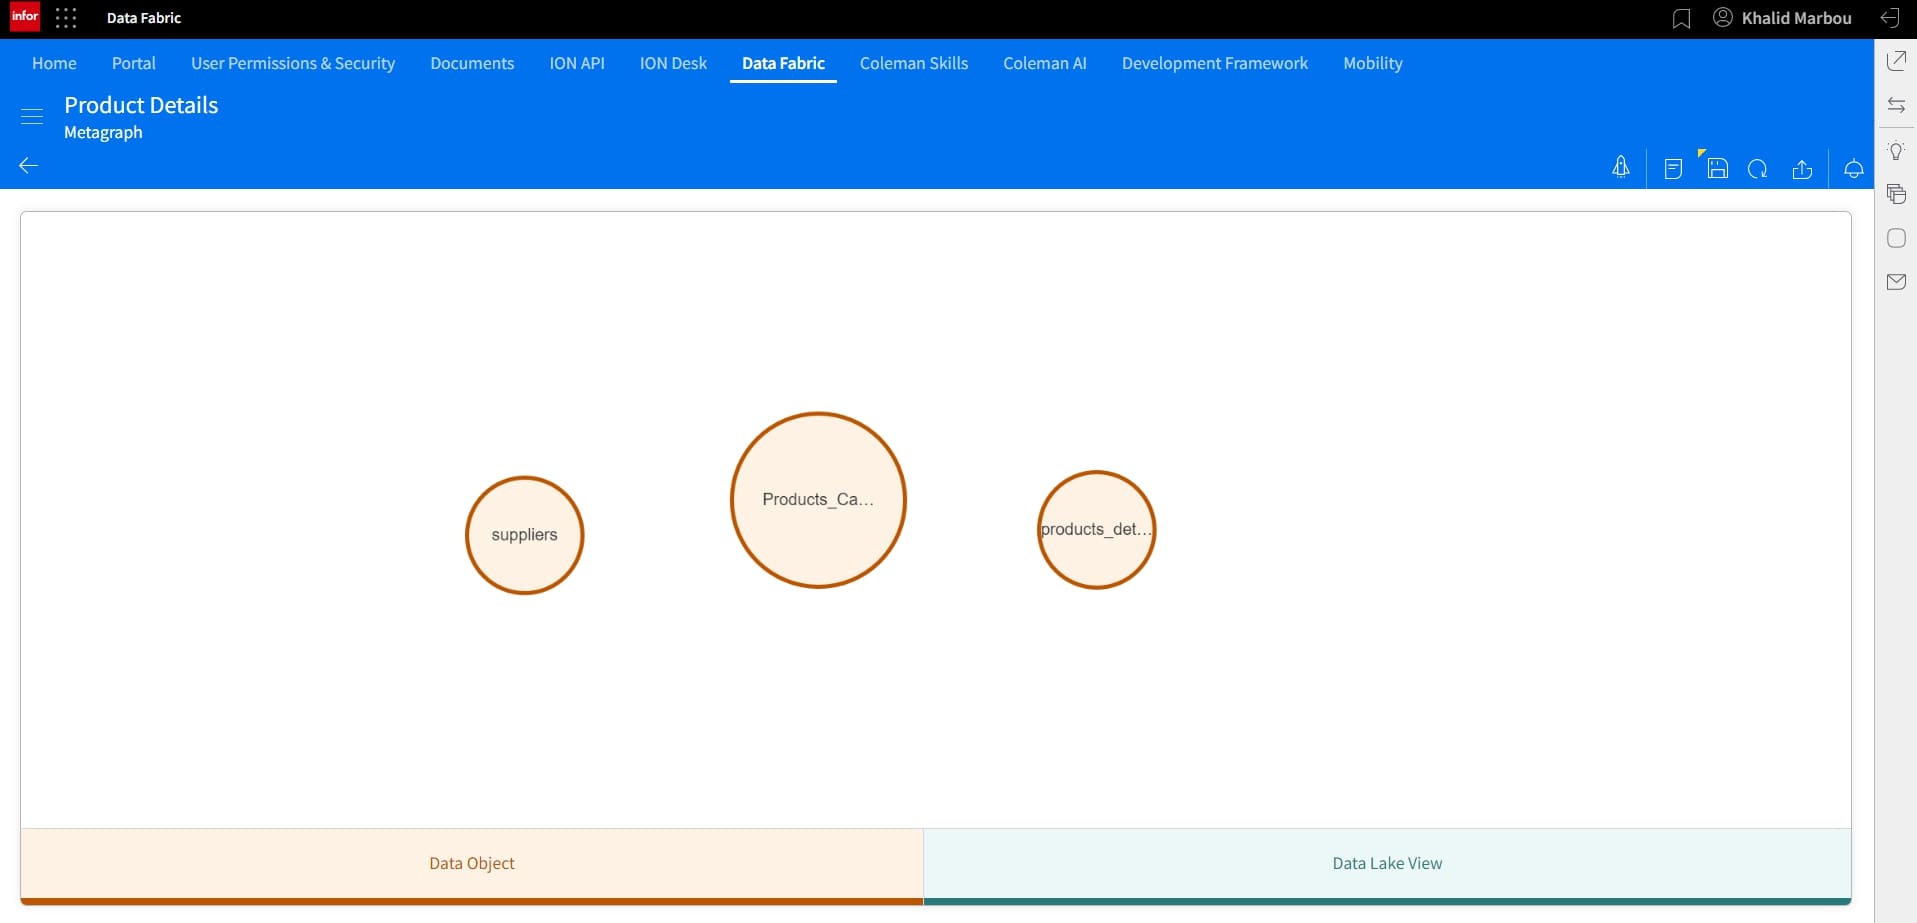
With all of our nodes in-place, we can proceed to connect them by building relationships between them.
And similarly for the other relationship:
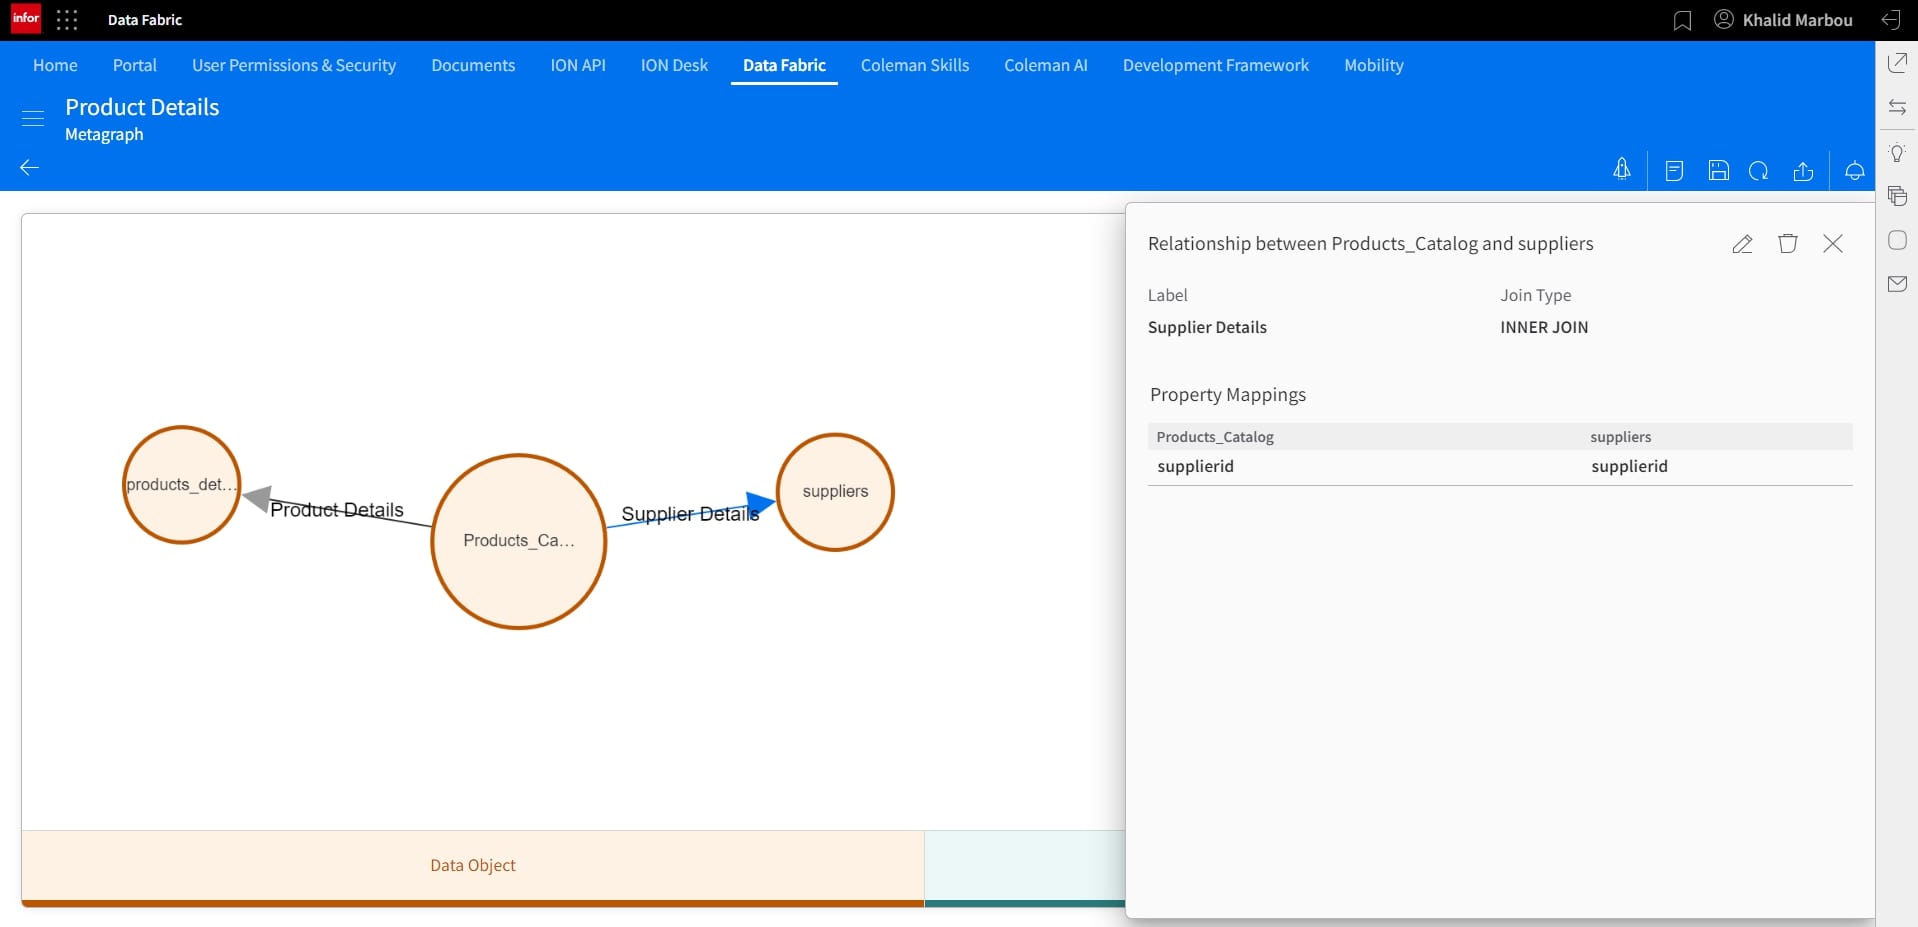
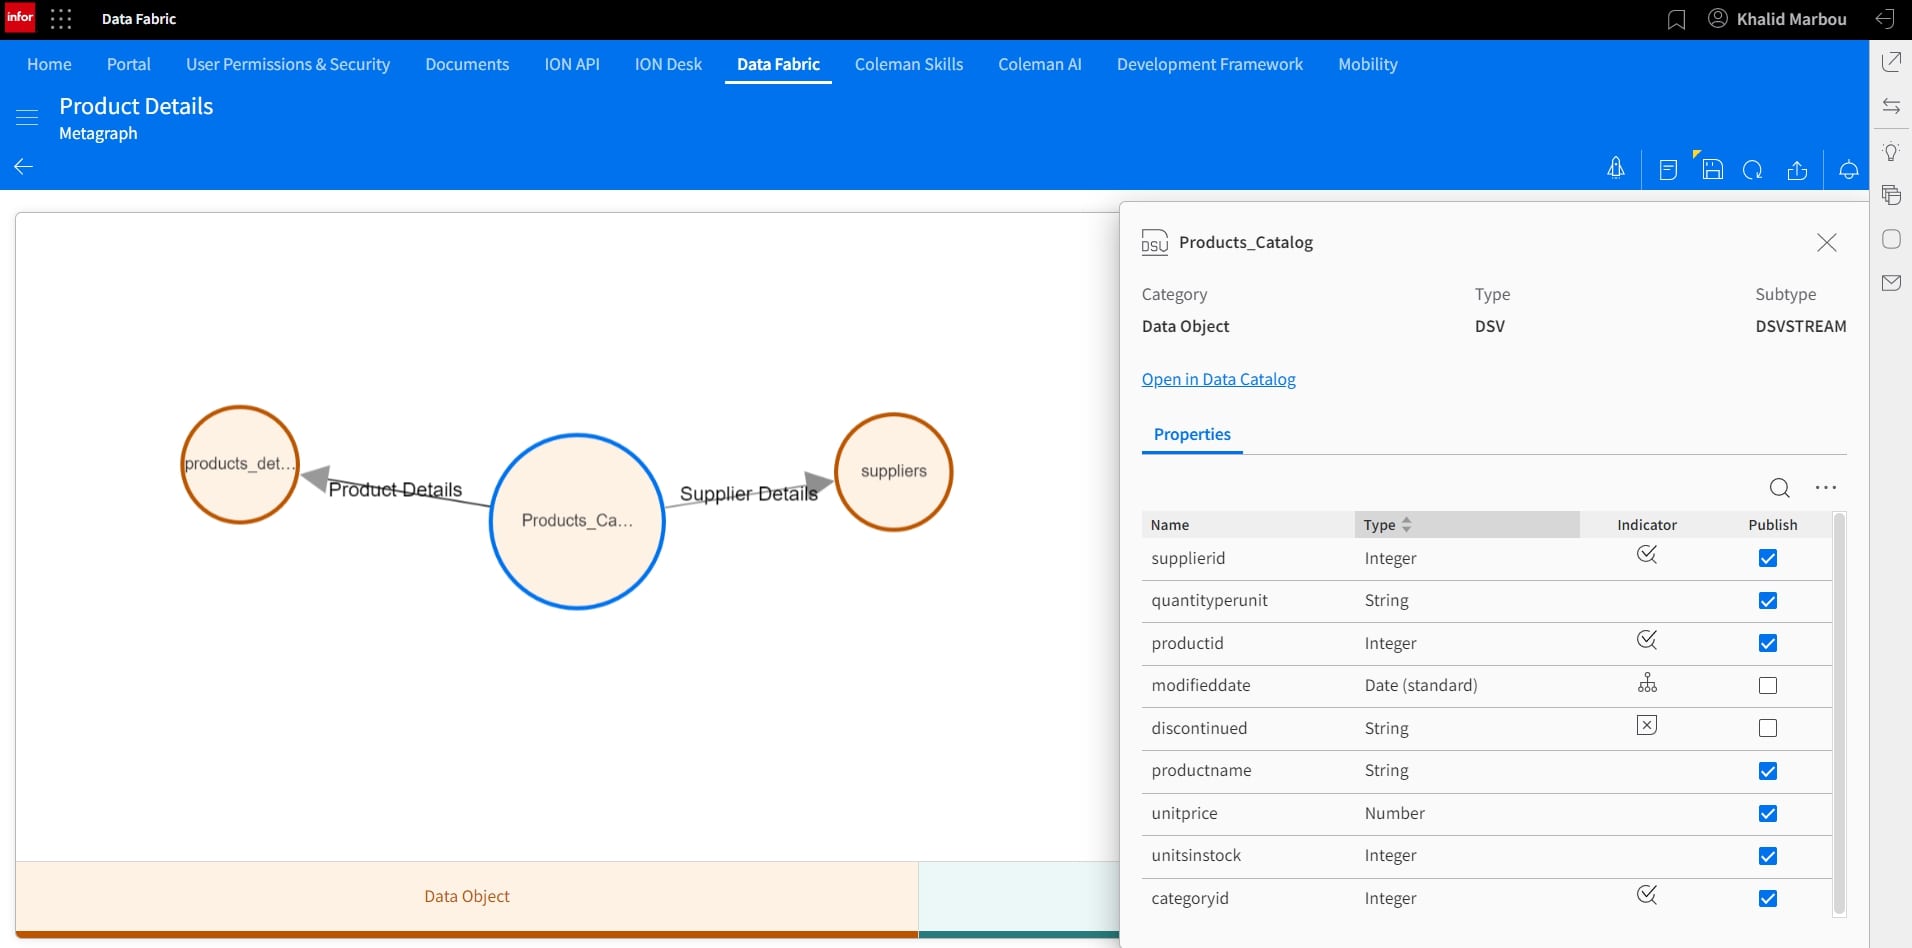
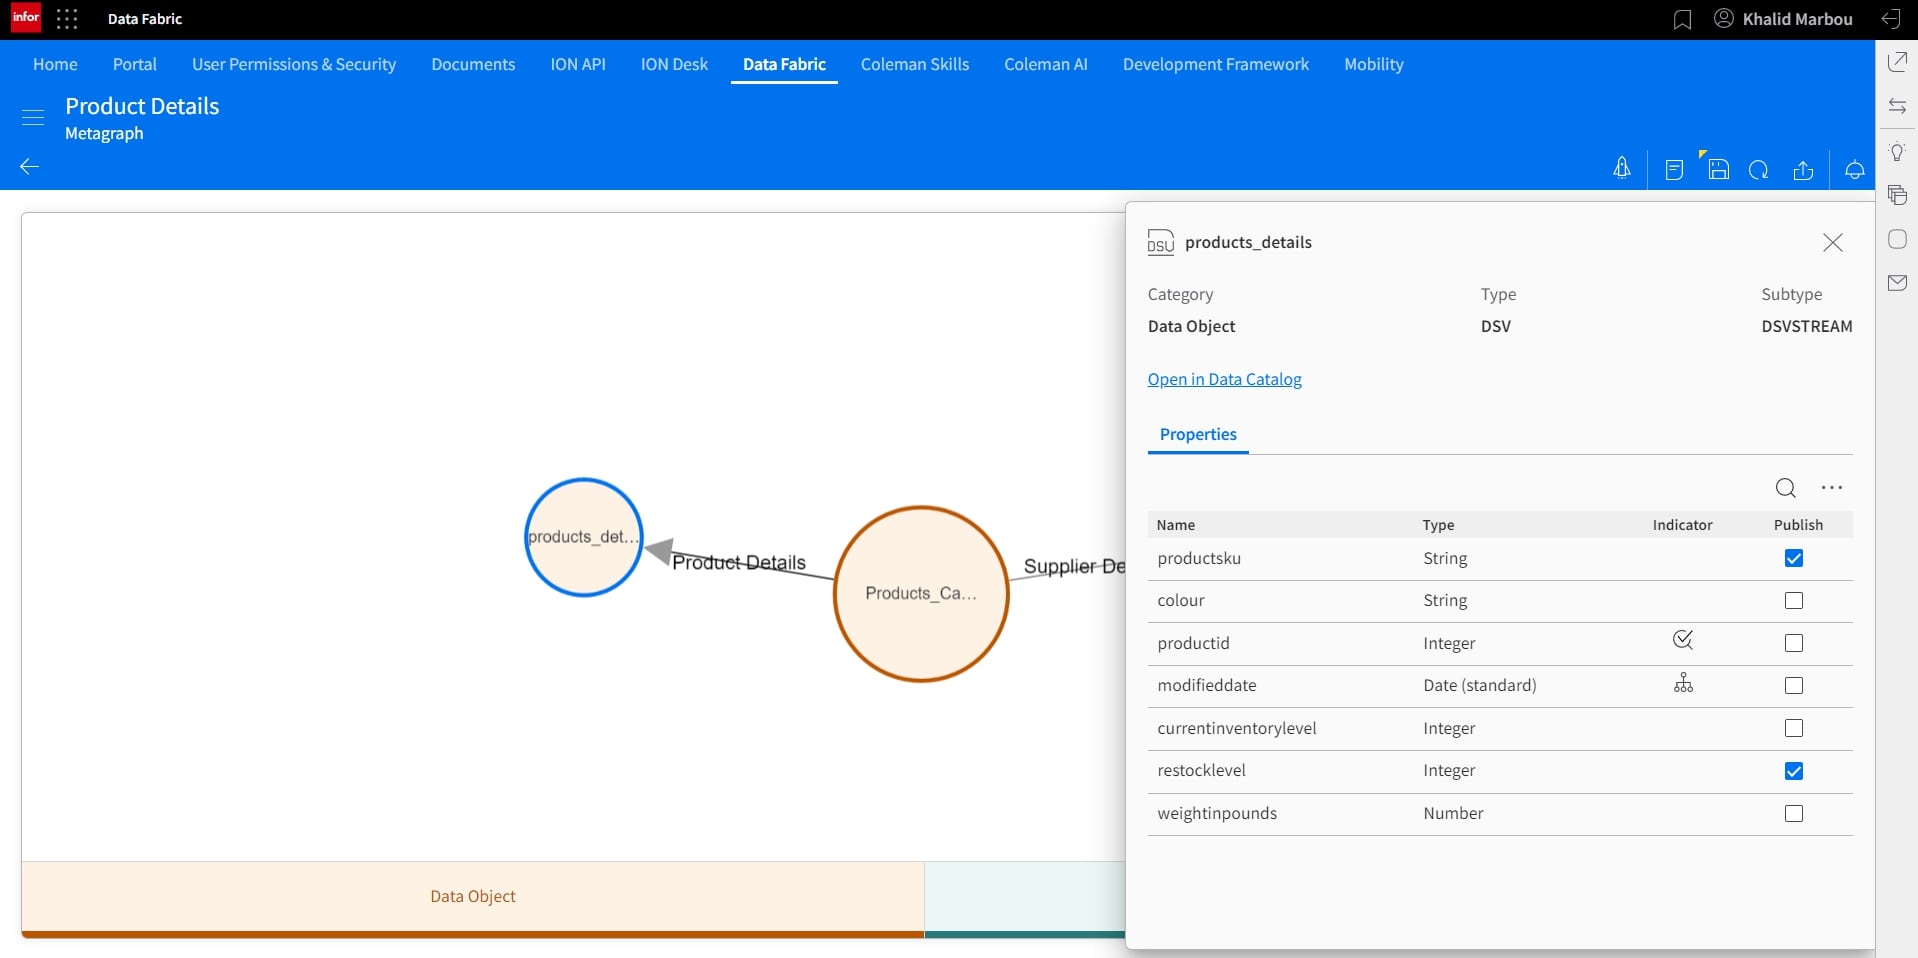
Before we start the publishing process, which would ultimately turn this model into a Data Lake View that provides easy and abstracted access, we can select the fields we’d like to include in the final data set. This can be done by clicking on each node and selecting using the checkboxes under the Publish column.
11. Publish and visualize the resulting Metagraph:
And finally, we can proceed to start the publishing process, by first assigning our Data Lake View a name, generating the SQL statement to preview the results and finally publish it as a View in Data Lake.
The newly created Data Lake View is now available for direct query in Compass.