Scripting & Visual Enhancements
Visual Enhancements: Charts, Scripts & Store Portal Foundation
We will learn how to create a chart and we’ll touch on creating a form script and attaching it to an event we will also start laying the groundwork for our store portal by importing images and expanding on our theme.
Form scripting
Form scripts are form specific and cannot be accessed by other forms. They are stored as part of the form definition as metadata in the forms database. While Mongoose considers it a best practice to limit the amount of code used, scripts can still be attached to a form or accessed from a global script when necessary. Previously, the Order Total did not calculate until the record was saved. This is because it is a derived field that doesn’t compute until save. In this next part, we are going to insert a form script that will calculate the order total immediately when the item or item count changes.
Launch Mongoose and use the toolbar icon to open the Web Designer.
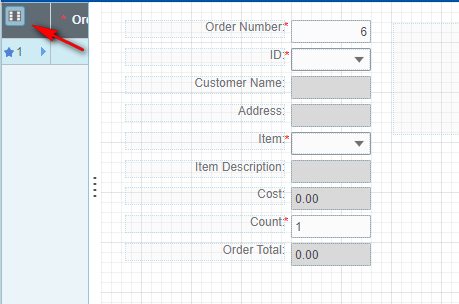
Open the Orders form, and in the Properties panel, select the Form tab at the bottom of the panel.
Under the Bahavior section, there is a Script Language field where you can specify what language you want to use in the form script. The default language is Visual Basic, the other available option is Visual C#. We will leave it set to Visual Basic.
Click the pencil icon in the top left corner of the Properties panel, and then select the Edit Form Script option. This will open up the built-in script editor.

Highlight the “Methods go here” section.

Copy and paste in the script below, Making sure the formatting is correct in the script editor.
NOTE: In this script, we will pass in the count and cost values into the script, perform the calculation, and then update the components.

Click Ok to return to the home screen.
Click Save.
Attaching scripts to events
We want to create an event that will trigger that form script whenever the item is changed or the count is changed.
Expand the Details pane on the bottom of the forms page.

Select the Event Handlers tab and select the New button at the bottom to add an event.

Set the event Name to CalcOrderTotal and click Ok.
Expand the Response section and using the drop down set the Type to Form Script Method, and then click the Parameters ellipsis.

On the Event Handler Parameters modal, for the Name field, select CalcOrderTotal.

For the Parameters field type: P(Count), P(ItmsCost) and then click Ok.
You can see here that we are using the P() substitution keyword. At runtime, this will pass in the property values of Count and Cost to our form script.
NOTE: We want to run this whenever the Count or Item is changed.
Select the Item Combobox component.

In the Properties panel, expand the Events section. From the drop down set the Data Change field to CalcOrderTotal.

Select the Count Edit component.

From the drop down set the Data Change field to CalcOrderTotal.
Click Save and close the form.
Switch back to the Runtime Mode tab and reopen the Orders form. Press F4 to query the data and test out our event by changing the item or the count of a record. You will see once either one of those is changed, the Order Total field will immediately update.

Let’s apply the same event to the grid column as well.
Select the FormCollectionGrid component and click the Edit Grid Column(s) button in the top left corner.

From the Contained Components modal, select the ItemGridCol.

In the Properties panel, expand the Events section. From the drop down set the Data Change field to CalcOrderTotal.
Perform the Data Change on the CountGridCol as well.

Click Ok and Save your form.
Switch back to the runtime mode tab and reopen the Orders form. Press F4 to query the data and test out our event by changing the item or the count of a record from the grid column. You will see once either one of those is changed, the Order Total field will immediately update.


Working with charts
In this section we will learn more about designing and developing the user interface. Mongoose has many components that allow us to build graphic-oriented UI’s.
There are many different types of components you can use when building your forms. In this next part, we will build a chart component to display key sales data.
Switch back to the Web Designer and click the New Form Definition icon from the toolbar.

On the Form Wizard Selection modal, for the Category select Classic and for the Wizard select GridOnly.

On the New Form Wizard set the Name field to OrdersChart and set the Data Source field to Orders.

Click Next and step through the wizard accepting the defaults, and then click Finish.
NOTE: When the form opens we see that since we chose GridOnly mode for the form type we only have a grid which spans the entire length of the form. The grid is only for debugging in this case so after we get everything set up we’re going to hide it.
Once the form opens in the Web Designer, select the FormCollectionGrid component and shrink it by clicking and dragging the corner in.

Move the grid towards the bottom of the form.

In the Properties panel, click the Form tab at the bottom. Expand the Behavior section and set the Initial Command property to Refresh.

From the Toolbox panel on the left, select the Chart component and draw it on the form.


With the chart component still selected, in the Properties panel, expand the Data Source section. For the Binding Type field select Chart from the drop down, then click the Binding ellipsis.

Once the Specify Chart Settings modal opens, under the Chart Data section, use the Add button to add the DerOrderTotal property.
Under the Property for X-Axis Labels section, select OrderNumber and then click Ok.

Next, we want to hide our grid so that only our chart is displaying on the form. Select the FormCollectionGrid component, and in the Properties panel, expand the Behavior section. Set the Hidden field to True.

Click Save.
Switch back to the Runtime Mode tab and open the OrdersChart form to see our chart in action.

NOTE: Say we wanted to use this form as a “widget” styled form to display on a dashboard. In order to do that, we want to shrink the size of the form. From the Properties panel, click the Form tab at the bottom. Expand the Layout section and then expand the Size section. Set the width to 35, and the Height to 15.
Importing images
Before we get started building out our portal, Import all of the images that we will need when we build out our Customer Portal. Mongoose has a built-in image library where you can store images for your application. These are stored in the forms database, and this makes it possible to transport the image file with the form. This eliminates the need to call the image from an external location.
Download and the extract the Customer Portal Images.zip file located in the Download section at the bottom of this Tutorial.
Switch back the Web Designer and click on the Edit -> Images menu item.
On the Images modal, click the New button.

Select or drag an image that was downloaded. Click the Upload button to import the image. Repeat this process for all Four of the images.
Here are a list of Images from the zip file.
- Customericon.png
- CustomerSignin.png
- ShoppingCart.png
- AddToCart.png
NOTE: The import button on the Images modal can be used when you want to overwrite an image that you have already imported. You can also use the export button to export any image.
Once you are done, click Ok.
Click Save.
Creating theme classes
In this next part, we will create some theme classes that we can use when we build our Customer Portal.
While in the Web Designer, select the Edit -> Theme menu item.

On the Global Objects modal, select the HelloWorld theme and then select the Edit… button in the top right to open the theme editor.

To start, let’s apply a font at the form level so that all the components on all of the forms will inherit that font.
On the Edit Styles modal, expand the Form section from the Elements tree on the left.
Select the FormComponent element and from the drop down set the Family field to Tahoma.


Click Ok.
Repeat the process, and create the following theme classes:
FlexLayout | BlueBackground | #FF5CC6C7 | |||
Static | WhiteHeader | 16 | True | #FFFFFFFF | |
Static | Header | 16 | True |
Select the FlexLayout component, give it a class name at the bottom of BlueBackground and then hit Add. Once you hit Add the tree will refresh so you’ll have to go back into the component and select it.

Reselect BlueBackground and set the background color to #FF5CC6C7 or select the ellipsis to pick color from the style editor.

Create a Static class. Click on the Static component, give it a class name at the bottom of WhiteHeader and then hit Add. Once you hit Add the tree will refresh so you’ll have to go back into the component and select it.

Reselect WhiteHeader and set the font Size to 16 and set Bold equal to True.

Select Normal State from the categories and set the foreground color, Type in #FFFFFFFF or click the ellipsis hit solid and let’s accept a default of white.


Click Ok.
Create a another Static class, Click on the Static component give it a class name at the bottom of Header and then hit Add. Once you hit Add the tree will refresh so you’ll have to go back into the component and select it.

Reselect Header and set the font Size to 16 and set Bold equal to True.

Once you are done adding your theme classes, click Ok until you return to the home screen.
Click Save.
NOTE: Anytime a change is made to the theme, you will have to sign out and sign back in to see those changes take effect.
Summary:
We introduced form scripts in mongoose, we were able to create a script that performed a calculation and then updated the property. We then attached that script to a custom event and triggered it on the data change event we started working with a chart component and used this to display key data in our orders table, then we got you familiar with the mongoose image library and how it can be used to import images to the forms database this makes it possible to transport image files with the form and eliminates the need to call the image from an external location. Lastly we built out some theme classes that will be used when we build out our customer portal.
Here is the Part 6 video showing the detailed steps to complete the previous tasks.
What made this section helpful for you?
What made this section unhelpful for you?
On this page
- Scripting & Visual Enhancements