How to create an RPA flow using Send Hotkey activity to access M3 popup
Intermediate | 25 Minutes
Overview
The Send Hotkey activity in RPA Studio allows you to send keyboard shortcuts to a UI element. By simulating keystrokes and keyboard shortcuts, you can streamline processes and interact with applications efficiently.
In the M3 web application, users can navigate to a specific screen by running a transaction code. For example, after logging into the M3 app and pressing CTRL+R, a Search and Start control appears. By entering the transaction code MFS100, users are directed to the Internal Invoice.Create screen.
📋 RequirementsYou need to install the latest version of RPA Studio on your machine:
|
Pre-requisites
- Target Application: Ensure the application or window is active and in focus.
- Key Identification: Know the exact keys or key combinations required.
- Modifier Keys: Understand how to configure and use modifier keys (Ctrl, Alt, Shift).
- Application State: Verify the application is in a state to accept the hotkey input.
- Timing: Be aware of any required delays between key presses.
- Error Handling: Implement error handling for potential hotkey failures.
Tutorial
1
Open RPA Studio
Open RPA Studio on your machine and sign in if required
2
Create a New Projec
On the Home page, click Create New Project and specify the following properties in the pop-up window:
- Name: M3HotKey
- Project Location:
- Description: Demo on M3 H
3
Model the Login Steps
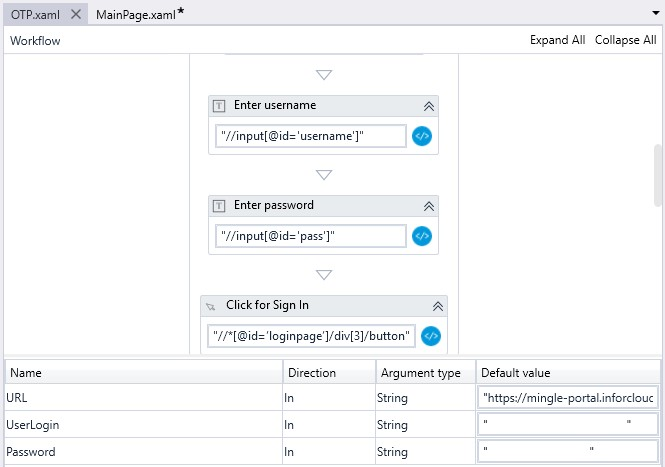
First, model the steps to log into the tenant, navigating directly to the M3 Home Screen. For the steps to log in, follow the tutorial: How to create an RPA Flow using the Get Microsoft OTP Code to login to Infor Tenant.
Note: You may want to skip particular steps that are not required in your tenant setup, like OTP code generation, and double-check the XPATH.
Alternatively, you can import the provided OTP.xaml into this project by importing and unzipping the project from How to create an RPA Flow using the Get Microsoft OTP Code to login to Infor Tenant. Then, right-click on the name of the project in the project panel and select Import File.

4
Start Building the Flow
Next, open MainPage.xml. Add the Invoke Workflow activity. You can find the list of activities by clicking Activities in the left-hand side bar or from the View menu in the top bar. Use the search bar to find the activity you want.
Configure the activity as follows:
- Input Arguments:
- Create 3 arguments of type string named: UserLogin, Password, URL with appropriate default values.
- Note: To simplify the setup, the names of the arguments should be the same as in OTP.xaml.
- Click on the Invoke Workflow activity and define the Input Arguments as follows:
New Dictionary(Of String, Object) From {{"URL", URL}, {"UserLogin", UserLogin}, {"Password", Password}}
This means that the value of the URL, UserLogin, and Password arguments will be passed to the subflow.

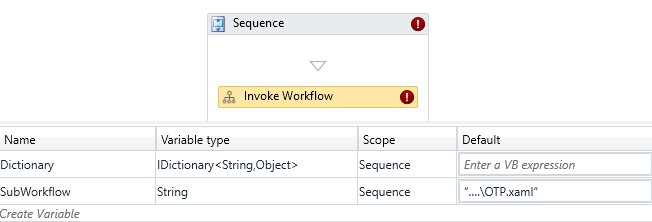
- Workflow File: Create a variable called SubWorkflow with the default value of the OTP.xaml workflow path (e.g.,
...\OTP.xaml). Note: The OTP.xaml workflow must be part of this specific project. - Output Arguments: Create a variable called Dictionary of type iDictionary<String, Object>.
5
Check the Variables in the Imported OTP.xaml
Go to the OTP.xaml sequence to validate that you have 3 arguments called: URL, UserLogin, and Password with Direction IN without the default values. These values will be passed from the main sequence.
6
Model the M3 Steps
After the Invoke Workflow activity logs you into the M3 application, model the steps to access the M3 Search and Start panel by using the “CTRL + R” hotkey.
- Use the To IFrame activity to switch to an iframe, as the target elements are located within it. Configure the activity as follows:
- For Wait After, add 2000 (this means the bot will wait 2000 ms after executing this activity).
- For Input, specify the following XPath:
"//iframe[contains(@name, 'm3h5_')]".

2. Now, use the Send Hotkey activity to send the keyboard keys CTRL + R to the M3 application, which will open the “Search and Start” dialog window. Configure the activity as follows:
- For Wait After, specify 5000.
- For Wait Before, specify 5000.
- For Modifier, select CTRL.
- For Key, type “+ R”.
- For XPath, specify "/html/body".

When the “Search and Start” control appears, the bot should click the input text box within this control. Add the Web/Click activity and for XPath, specify "//input[@id='search-and-start-autocomplete']". You can rename the Click activity to "Click search-and-start-autocomplete".

3. Next, model the step to send the required program code value (e.g., MFS100) to this input text box. Use the Send Keys activity. For Key, specify the program code (e.g., MFS100).

4. Finally, model the step where the bot clicks the ‘OK' button on the “Search and Start” control. Use the Click activity and configure it as follows:
- For Wait After, add 3000.
- For XPath, specify
"//button[@id='oc-btn-ok']".
7
Execute the Flow
Now, save your flow. Click Run to execute and verify that the user is successfully navigated to the required Invoice Creation screen in the M3 application.
What made this section helpful for you?
What made this section unhelpful for you?
On this page
- How to create an RPA flow using Send Hotkey activity to access M3 popup