Table Joins & Interactive Extensions
Extending the App: Themes and Orders Setup
We are going to extend our application further by building onto our existing items table. We will get started on working with themes and theme classes and we’ll create our orders facility that will allow users to place orders in our store portal.
We will extend the orders table further by joining it with tables and adding property class extensions to support drill downs. We will create a drive field for a calculation and we’ll expand on the inheritance model by building out component classes and validators that can be reused throughout our application.
Join tables to Orders
Now that we have all of our tables built out, we can now add in some table joins that will link together the related tables.
Launch Mongoose and select Form > Open.

In the Filter field, type: IDOs, and select the IdoCollections form.

Click Ok.
For the IDO Name field, type: Orders and then press F4 to query the data.

With our Orders IDO selected, click on the Table Button

Then click the New Table button.

Select the Customer table, and for the Table Alias type: cus.
We want to join the the ID from the Customer table, to the CustomerID on the Orders table. In the Join Conditions section, create the following join statement:
ID = Orders(ords).CustomerID
Click Add then Ok

Click the New Table button again. This time lets create a join to the Items table.
Set the Table Name to Items and for the Table Alias field, type: itms. In the Join Conditions section, create the following join statement:
Item = Orders(ords).Item
Click Add, then Ok.
Binding joined properties
Now that we have our tables properly joined, we can bind properties from those tables onto our Orders table.
On the IDO Collections form still open, click the Tables button.
Select the Customer table row and then click the Bind Properties button.

Deselect all of the properties, except for Name and Address, then click the Massage Property Names button.

NOTE: You can change the property names manually, or you can use the Massage Property Names button which will allow you to add in naming conventions to all of the properties you want to bind. This is particularly useful in cases where you need to bind a large number of properties from another table.
When the Massage Property Names modal opens, for the Property Prefix field, type: Cus This will prefix the two properties we are adding, Name and Address, with Cus

NOTE: We consider it a Best Practice to prefix any properties from another table with that table’s alias.
Click Ok. Notice now in the Property Names column, that our selected properties are now prefixed with Cus. Click Finish to create the properties on the Orders IDO.

Close the IDO Properties form that automatically opens after the properties are created, and let’s bind some properties from our Items table.
On the IDO Tables form, select the Items table name row. Then click the Bind Properties button.
Deselect all of the properties except for Cost, Description, and Picture.

Click the Massage Property Names button, and in the Property Prefix field, type: Itms

Click Ok.

Click Finish.
Upon completion, this will launch the IDO Properties form. Here we can manually add attributes to our new properties.
Add the following attributes to the following properties:
Here is an example of the Label String ID field.

- CusAddress: For the Label String ID field, type: sAddress.
- ItmsCost: For the Property Class field, select our Cost property class.
- ItmsDescription: For the Label String ID field, type: sItemDescription.
- CusName: For the Label String ID field, type: sCustomerName.
- ItmsPicture: For the Property Class field, select our Picture property class.
- CustomerID: Replace the Label String ID field with: sCustomerID.
Click Save and close the IDO Properties form. Close the IDO Tables form as well.
Derived properties
So far, all of the IDO Properties we’ve used have been bound to columns on tables, but properties can also be calculations, input to server-side update logic, or relationships to other IDOs. In this next part, we will create a derived property on the Order IDO that will perform a calculation to retrieve the order total amount.
With the IDO Collections form still open, let’s add a derived property to our Orders IDO. Click the New Property button. Select Derived and click Next.

For the Property Name field, type: DerOrderTotal.
NOTE: We consider it a Best Practice to always prefix your derived properties with Der, indicating that it is a derived property.
For the Property Class field, select our Cost property class.
In the Expression text box, type in the following statement: Count * ItmsCost
Uncheck the Inherit from Property Class options.
These expressions are evaluated as a SQL SELECT statement. Property names in these expressions are case-sensitive.

Click Finish.
Let’s add a label string id to our newly created property.
On the IDO Collections form, click the Properties button.
Navigate to the DerOrderTotal property, and notice that it is inheriting the Label String ID from the Cost property class. To override that inheritance, change the Label String ID to sOrderTotal.

Select the Read Only option at the bottom of the Formatting section (all derived fields are inherently read only).
Click Save and Close the IDO Properties form and IDOs form.
Unload Global Form Objects in both Runtime mode. Form->Definition->Unload Global Form Objects.
Creating more property class extensions
Next let’s create property class extensions for the Item and CustomerID property classes to enable them to have drill downs. This is the same process we went through in Part 4 so this should look familiar.
Launch the Web Designer, and open the Orders form Form -> Orders.

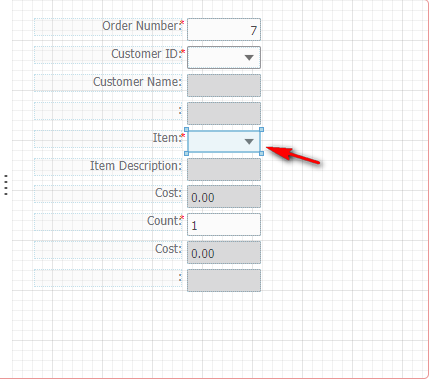
Select the ItemCombobox (Item) component.

From the Properties panel, expand the Inheritance section. On the Edit Property Class Extension field, click the ellipsis.

When prompted if we want to create the property class extension, click Yes.
After the Property Class Extension modal opens, expand the Behavior section, and then expand the Add/Details and Find Form section. Set the Add/Details and Find Form fields to Items. Set the Property field to Item.
Scroll down and set the Right-Click Menu field to StdDetailsAddFind, click Ok.

Next, let’s repeat this process for the CustomerID field. Select the CustomerIDCombobox component.
In the Properties panel, expand the Inheritance section. In the Edit Property Class Extension field, click the ellipsis.
When prompted if we want to create the property class extension, click Yes.
After the Property Class Extension modal opens, expand the Behavior section, and then expand the Add/Details and Find Form section. Set the Add/Details and Find Form fields to Customer. Set the Property field to ID.
Scroll down and set the Right-Click Menu field to StdDetailsAddFind.
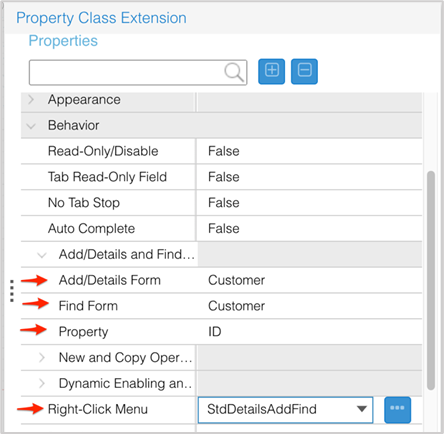
Click Ok.
Click Save. and close the form.
Recreating the Orders form
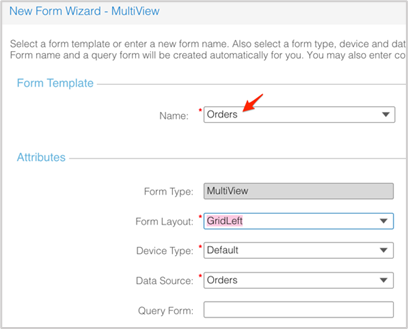
Now that we have added more properties to the Orders IDO, we need to add these new properties to our Orders form. Rather than adding each property manually, we can use the New Form Wizard to replace our existing Order form with our new properties.
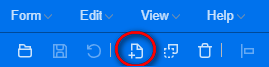
With the Web Designer still open, click the New Form Definition icon.
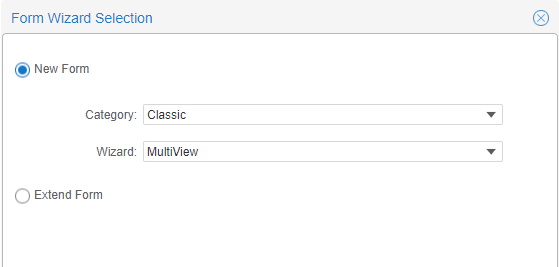
In the Form Wizard Selection modal:
- Category: Classic
- Wizard: Multiview
Click Ok. Once the New Form Wizard launches, for the Name field, select our existing Orders form name. Keep the default Data Source of Orders and click Next.
When prompted if we want to replace the Orders form, click Ok.
Add the following properties below and then click Next.
- OrderNumber
- CustomerID
- CusName
- CusAddress
- Item
- ItmsDescription
- ItmsCost
- ItmsPicture
- Count
- DerOrderTotal
Using the arrow buttons on the right, reorder the properties so that they appear in the order below:
- OrderNumber
- CustomerID
- CusName
- CusAddress
- Item
- ItmsDescription
- ItmsCost
- Count
- DerOrderTotal
- ItmsPicture
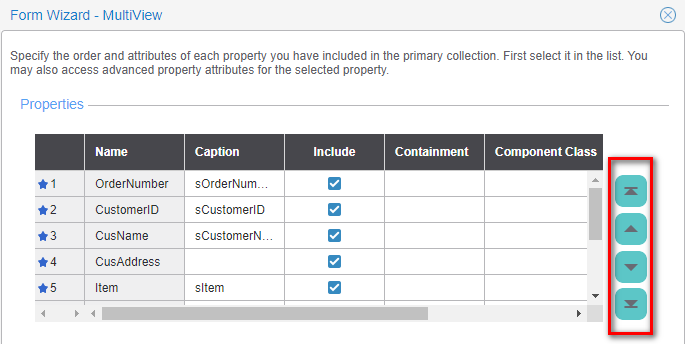
Click Next, and then click Finish. Say Ok to replace the form.
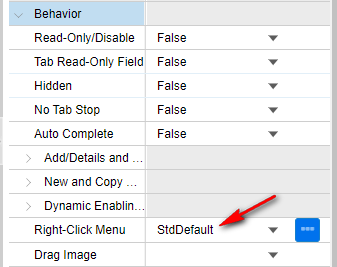
Remember by default, Mongoose sets a Right-Click menu definition at the component level. Let’s remove it so it doesn’t override the menu set at the Property Class extension level.
In Design Mode, open your updated Orders form, select your Customer ID combo box.
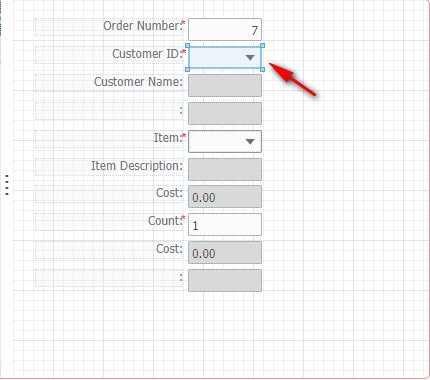
In the Properties panel, expand the Behavior section and remove the Right-Click Menu of StdDefault.

Do the same for the Item combo box.
In the Properties panel, expand the Behavior section and remove the Right-Click Menu of StdDefault.
Click Save.
Testing the property class extensions
When a property class extension is created, it is always attached to its associated property class. That means that because we have our property classes assigned on the IDO properties, they will automatically be inherited on our new Orders form.
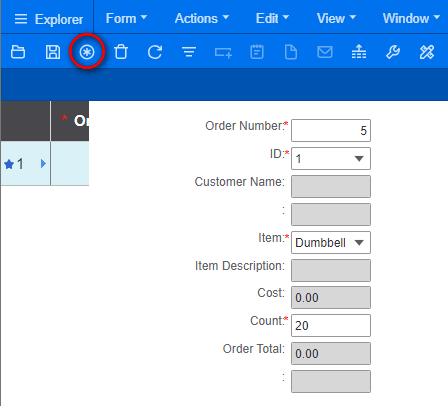
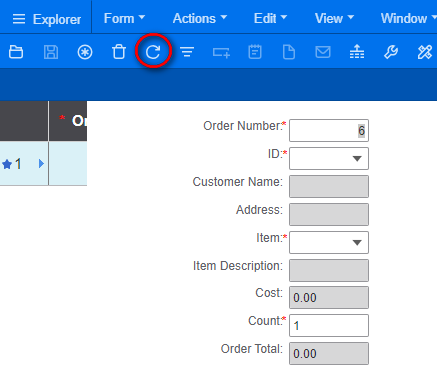
Switch to the Runtime Mode tab, and press F4 to query the demo data we entered earlier.
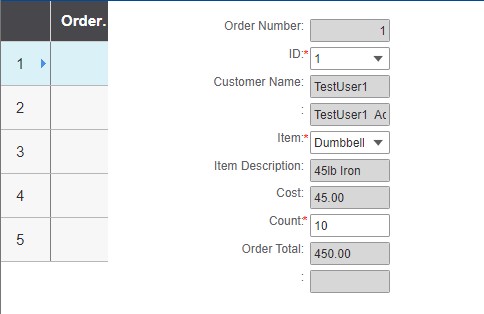
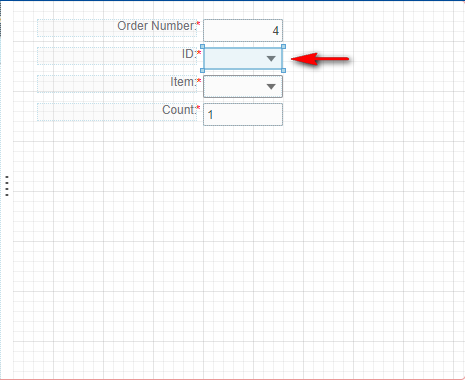
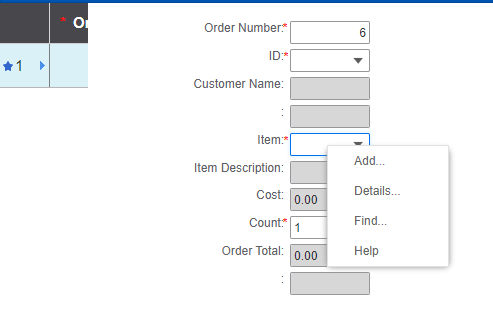
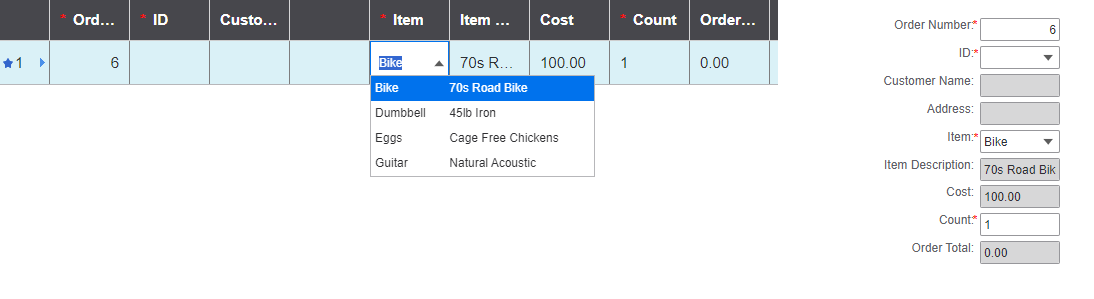
Right-click on the Customer ID and Item fields, and you will see that the right-click menus defined on our property class extensions are still working.
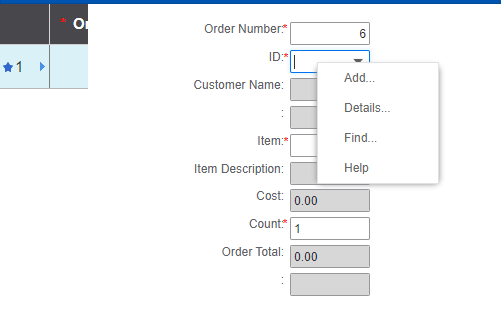
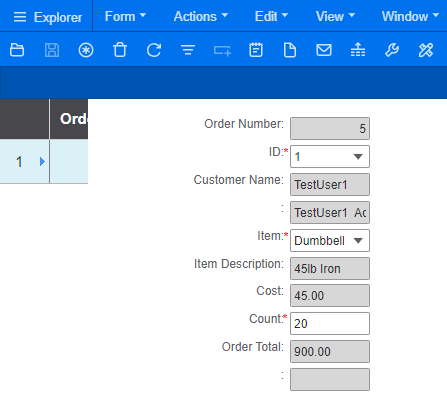
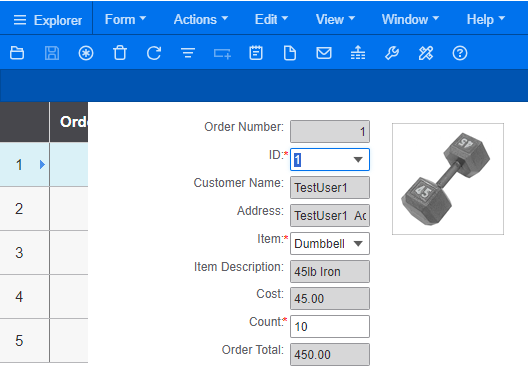
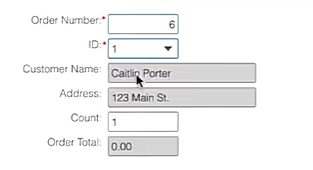
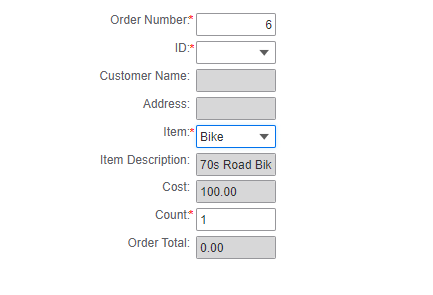
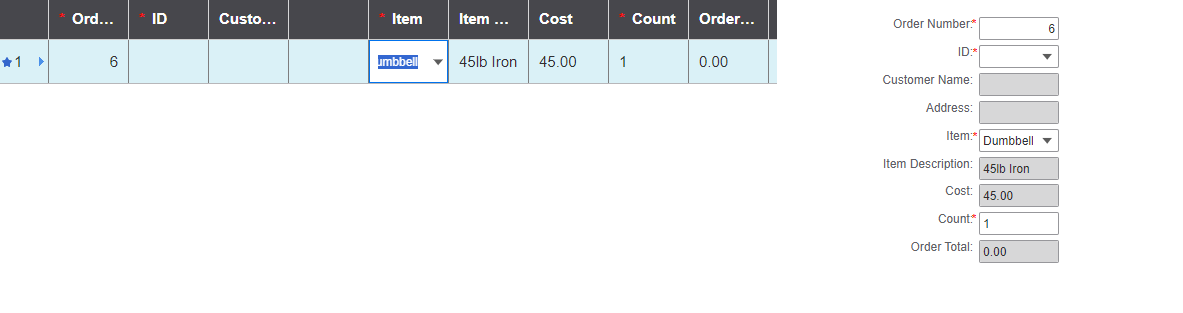
Verify that our DerOrderTotal calculation is working properly. Change the Item or the Count field and save the record. Upon save, you will see the Order Total field will update accordingly.
Example After Save.
Displaying binary images
Rather than displaying the binary value of our Picture property, we want to only display the image itself.
Switch back to the Orders form in the Web Designer. Select the ItmsPictureStatic component and delete it by pressing the Delete key.
Select the ItmsPictureEdit component.
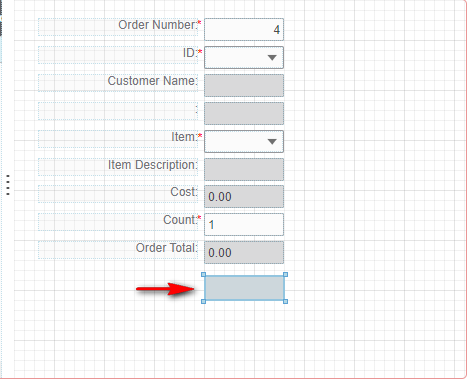
In the Properties panel, change the Type to Static.
Clear out the Caption field, under the Miscellaneous -> Specific Attributes section set No Colon to True.

Move the ItmsPictureEdit to the right and click and drag the corners out to increase the size.
NOTE: If you notice that some of your labels don’t have string values, or is preceded with a “s” value. Go ahead and create any missing strings by selecting the ellipsis on the caption field and selecting Yes to create them.
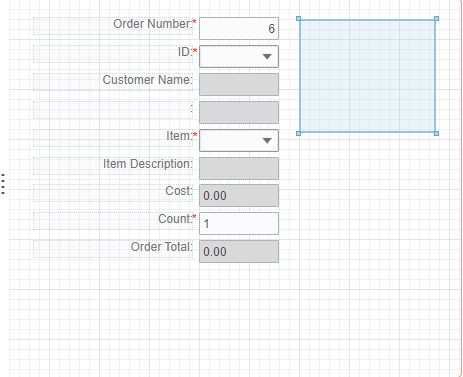
Regenerate Form. Some form changes require you to save, close, and reopen the form to see those changes. You can use the Regenerate Form button on the toolbar to do that.
Switch back to the Runtime Mode tab and reopen the Orders form, and press the Refresh button or F4 to query the data. Our Picture property now displays the Item’s image. Select a different record on the Orders form, and you will see that the picture will update each time you switch records.
Validators
Validators are another type of global object that can be used in multiple ways. They can be set up to validate a value as well as return output values to the form for functions, like displaying associated descriptions or setting down-stream component defaults. These can be run immediately on data change or can be run upon form save. In this next part, we will create a validator that will populate the customer Name and Address fields immediately after selection of a customer.
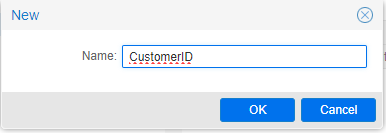
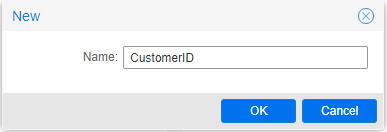
Switch back to the Web Designer and select the Edit > Validator menu item. Once the Validators modal opens, click the + button in the bottom left corner to add a new validator. For the Name, type: CustomerID and click Ok.
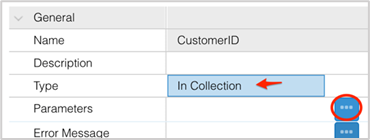
Set the Type to In Collection, and in the Parameters field, click the ellipsis.
When the Edit In Collection Validator Parameters modal opens, set the IDO field to Customer and in the Collection Only sections. Use the ellipses to set the Property value to ID.
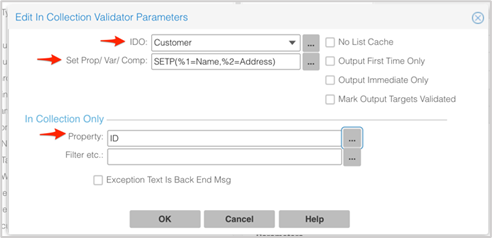
Then click the Set Prop/Var/Comp ellipsis.
NOTE: For an in collection validator like this Mongoose will format a where clause comparing the values based on the current component’s value versus the column’s value. Mongoose executes a database query with an in collection validator so if other values are needed from the table it’s an efficient time to get them during this query. In our case along with the validations we want to bring back the customer name and customer address fields and place those onto the form.
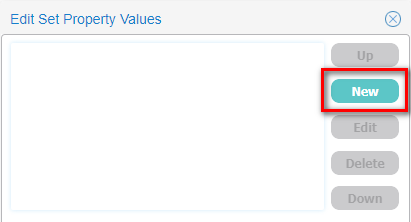
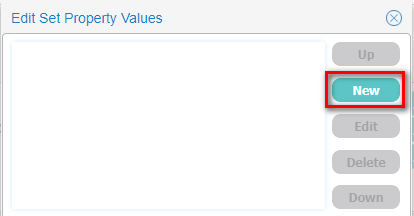
On the Edit Set Values modal, click the Properties ellipsis to specify what properties we want to set.

On the Edit Set Property Values modal, click the New button.
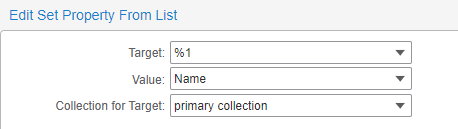
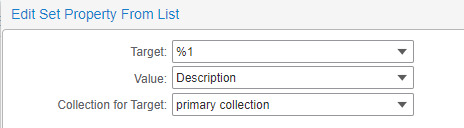
For the Target field, type: %1. Set the Value field to Name from the drop list and keep the Collection for Target set to primary collection. Click Ok.
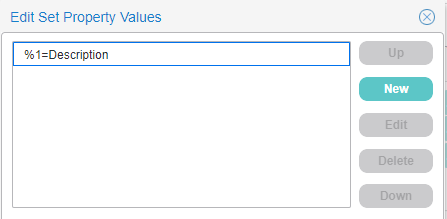
On the Edit Set Property Values modal, click the New button to add another property.
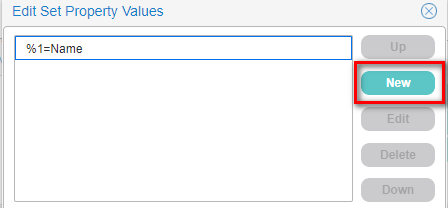
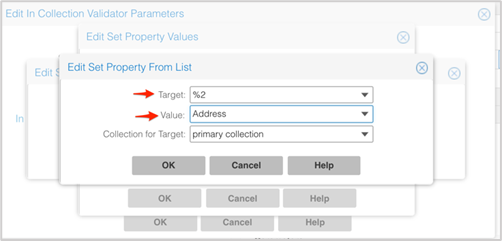
For the Target field, type: %2. Set the Value field to Address from the drop list and keep the Collection for Target set to primary collection.
NOTE: In this scenario we are using position parameters instead of named parameters. This allows us to pass in the name of the component we want to populate within the component class, allowing this component class to be reusable throughout our application.
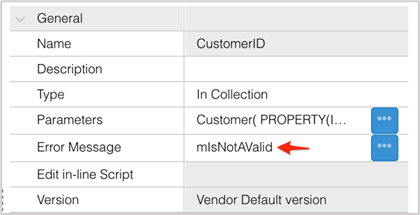
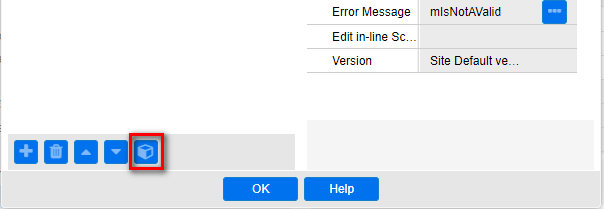
Click Ok until you get back to the Global Objects window. For the Error Message field, select the standard error message mIsNotAValid.
NOTE: mIsNotAValid is a standard mongoose error message that we can use.
Click Ok and Save.
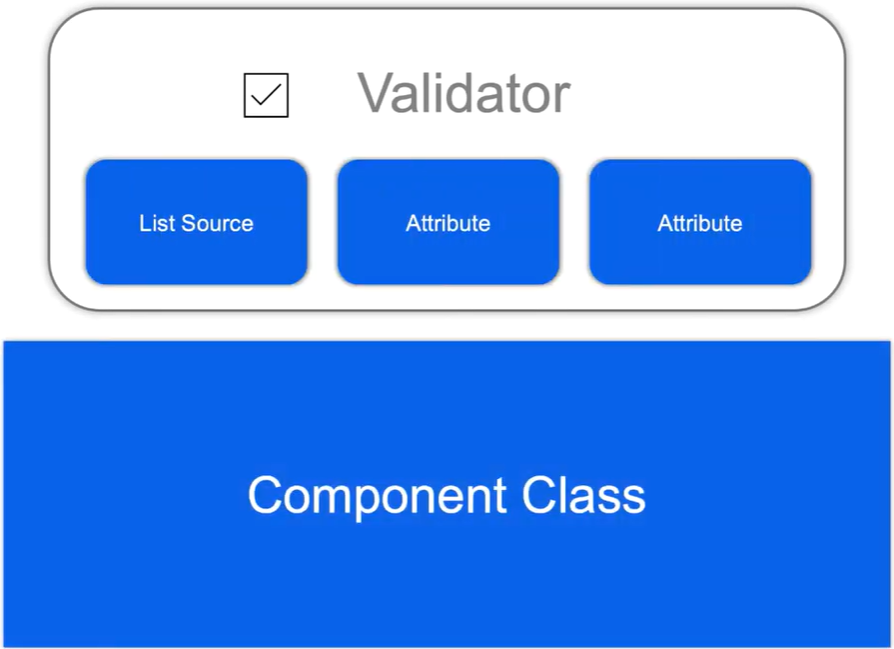
Component classes
Component classes are another type of global object that lets you bundle together sets of component attributes that can be reused throughout an application.
Based on the inheritance model, component classes will override any attributes set at the property class or property class extension levels.
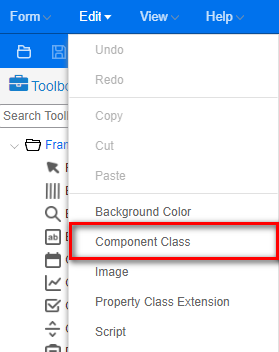
With the Web Designer still open, select the Edit > Component Class menu item.
Click the + button (New) in the bottom left corner.
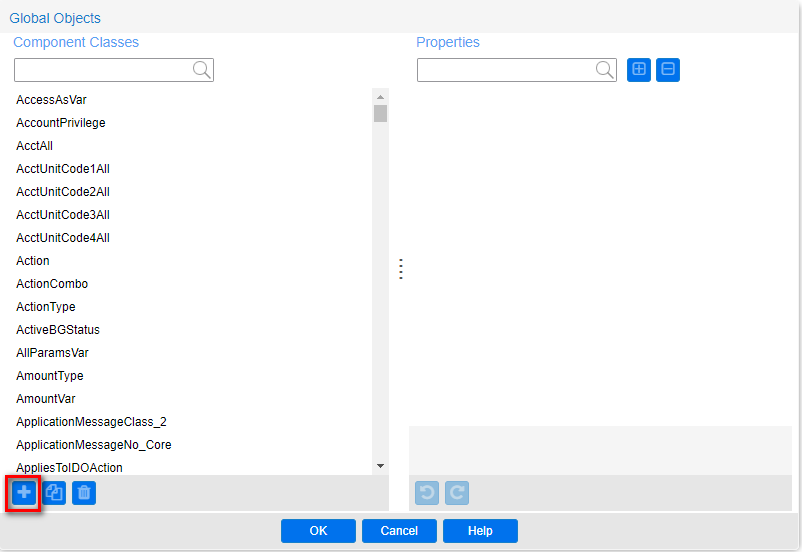
Give it a Name of: CustomerID and click Ok.
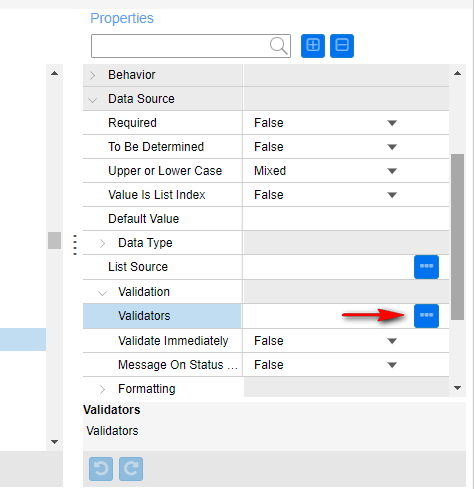
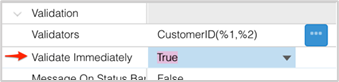
Within the Global Objects modal, in the Properties panel, expand the Data Source section. Expand the Validation section and click the Validators ellipsis.
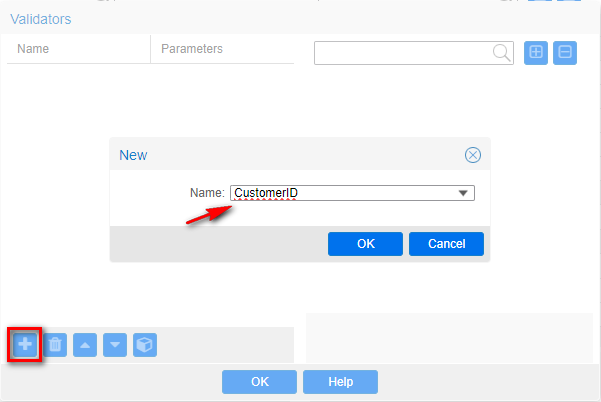
On the Validators modal, click the + button to add a validator to our component class. On the New modal, select our CustomerID validator and click Ok.
On the Validator modal, click on the CustomerID validator. Then click on the Parameters icon on the bottom.
NOTE: We need to pass the %1 and %2 parameters to the validator, doing this will effectively pass whatever was passed to the component class straight through to the validator.
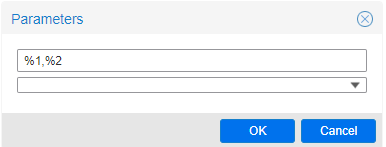
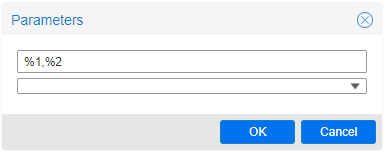
Once the Parameters modal opens, type: %1,%2 into the first field and then click Ok.
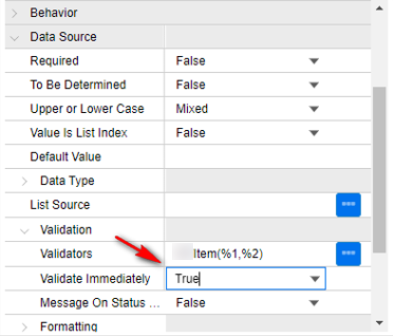
Click Ok to close the Validators modal. On the Global Objects window, under the Data Source section, set the Validate Immediately field to True.
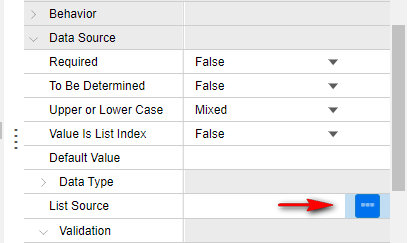
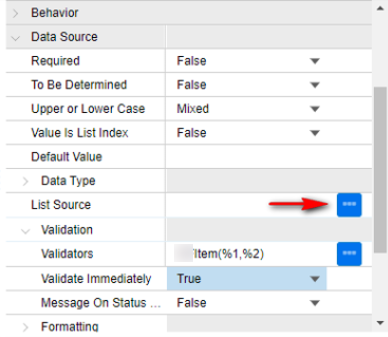
NOTE: The last thing we need to define on our Component class is a list source. We’re inheriting a list of ID and name from the CustomerID property class but the CustomerID validator we created has an output of both the customer name property and address property. By default for efficiency when the user selects a value from the drop down as opposed to typing a value in, Mongoose avoids making an actual round trip to query from the database, assuming that the list entries are all valid values we need a list source that includes not only the ID and name but also the address in the list source.
Click the List Source ellipsis.
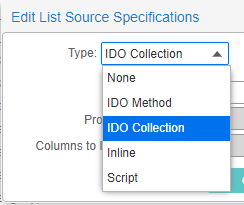
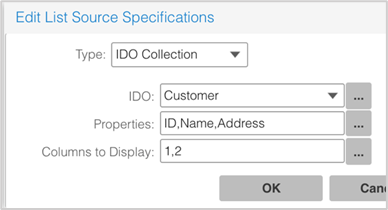
On the Edit List Source Specifications modal, set the Type field to IDO Collection from the drop down list.
For the IDO field, select Customer and then click the Properties ellipsis.
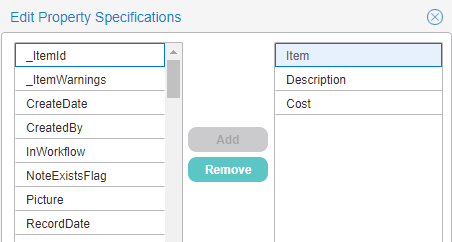
On the Edit Property Specifications modal, use the Add button to add the ID, Name, and Address properties. Then click Ok.
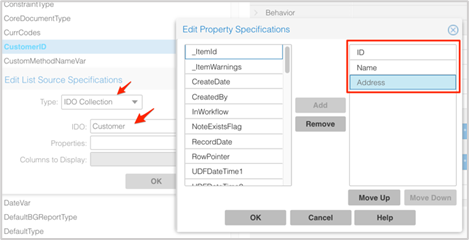
NOTE: Any properties that are used in a validator, must be included on the list source component.
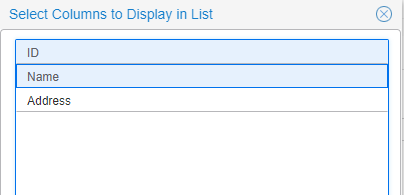
Click the Columns to Display ellipsis and hold Shift to select ID and Name.
Click Ok.
Click Ok until you return back to the home screen.
Click Save.
Unload Global Form Objects in both Runtime Mode and Design Mode. Form->Definition->Unload Global Form Objects.
NOTE: With our validator and list source packaged up into a component class, We can use this on our orders form.
Open the Orders form and select the CustomerID Combobox component.
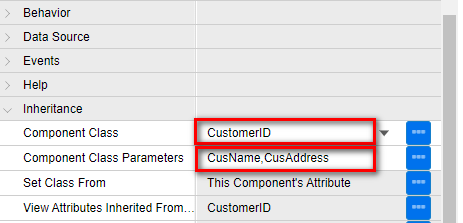
In the Properties panel, expand the Inheritance section, and set the Component Class field to CustomerID.
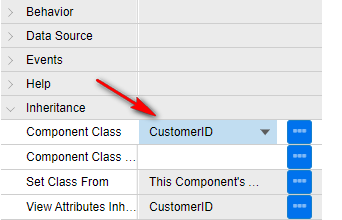
Next, we need to pass in parameters for the validator with the properties we want to populate on our form.
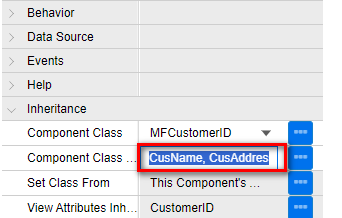
In the Component Class Parameters field type in the name CusName, CusAddress. Which will receive our Customer Name and Customer Address properties.
There is also a grid column component bound to the CustomerID property, let’s apply our reusable component class there as well.
Select the FormCollectionGrid component and click the Edit Grid Column(s) button in the top left corner.

From the Contained Components modal, select the CustomerIDGridCol.
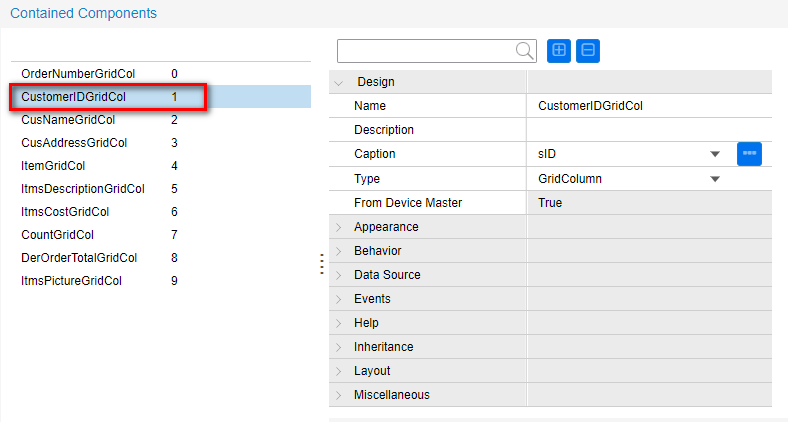
Expand the Inheritance section and set the Component Class field to CustomerID. In the Component Class Parameters field, type: CusName, CusAddress.
Click Ok and Save your form.
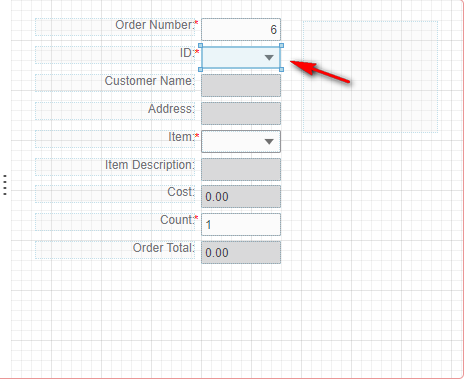
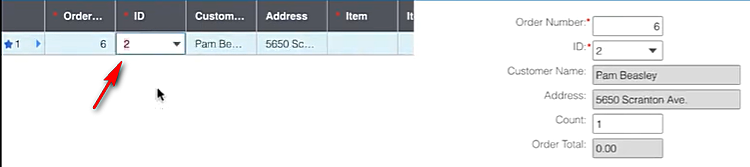
Switch back to the Runtime Mode tab and reopen the Orders form. Test out our component class and validator by selecting a different Customer ID. After selection, the Customer Name and Address fields will now update immediately.
Now when you select a different customer, the customer name and address will immediately output thanks to our validator.
We can also test this in our grid. Click on the grid splitter and drag it to expand.
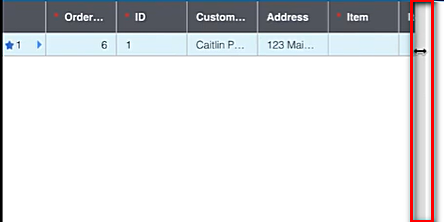
You will notice once we change the ID that both the Customer Name and Address will update there as well.
Create an Item component class and validator
In this next part, we will create another component class and validator that will be used on our Items field. This will be used to populate the item description and cost immediately after selection.
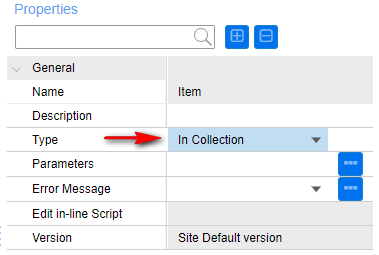
Switch back to the Web Designer and click on the Edit > Validator menu item. On the Global Objects window, click the + button at the bottom. Set the Name field to Item and click Ok.

Select the validator, and in the Properties panel on the right, set the Type field to In Collection.
Click the Parameters field ellipsis.
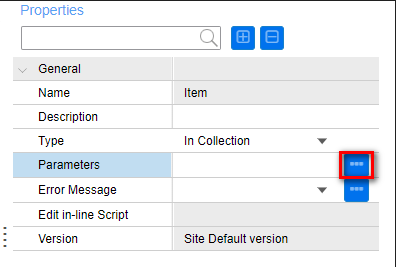
Set the IDO field to Items. Set the Property field to Item.
Click on the Set Prop/Var/Comp ellipsis.
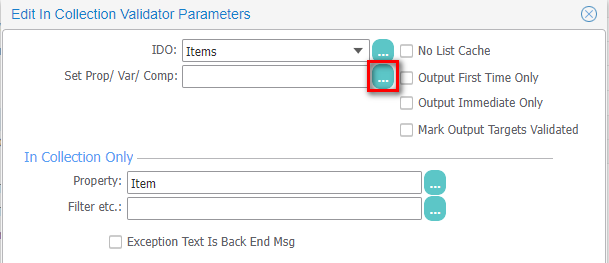
On the Edit Set Values modal, click the Properties ellipsis to specify what properties we want to set.
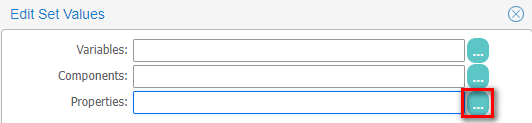
On the Edit Set Property Values modal, click the New button.
For the Target field, type: %1. Set the Value field to Description from the drop list and keep the Collection for Target set to primary collection. Click Ok.
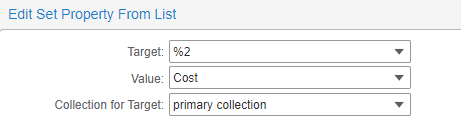
On the Edit Set Property Values modal, click the New button to add another property.
For the Target field, type: %2. Set the Value field to Cost from the drop list and keep the Collection for Target set to primary collection.
Click Ok until you get back to the Global Objects window. For the Error Message field, select the standard error message mIsNotAValid.
NOTE: mIsNotAValid is a standard mongoose error message that we can use.
In the Properties panel, set the Error Message field to mIsNotAValid and click Ok.

Next let’s create a component class that will use this validator and be reusable.
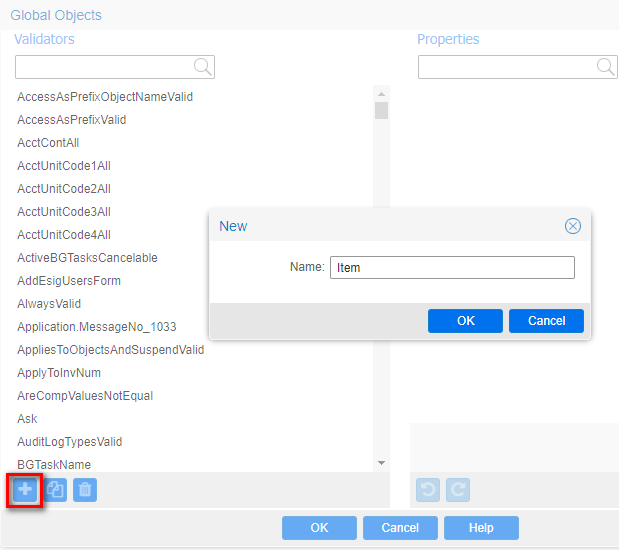
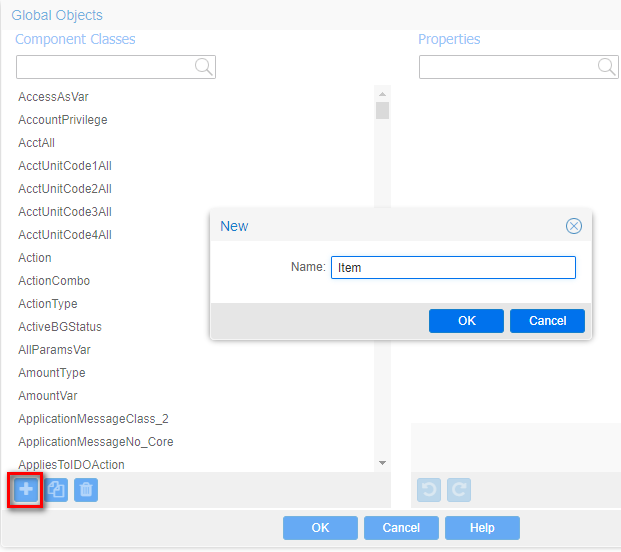
Click on the Edit > Component Class menu item. On the Global Objects modal, click the + button on the bottom left. Set the Name field to Item, and then click Ok.
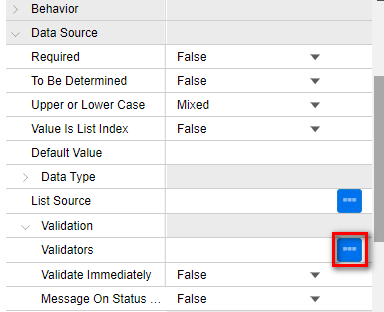
From the Global Objects modal, in the Properties panel, expand the Data Source section and then expand the Validation section. Click the Validators ellipsis.
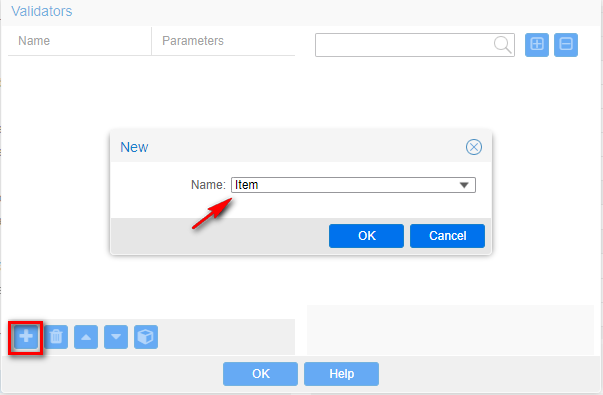
On the Validators modal, Click the + button and for the Name field, select the Item validator.
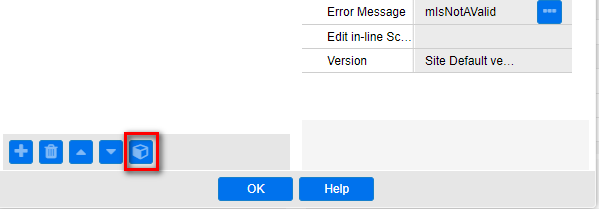
Select the Item validator on the left, and then click the Parameters button at the bottom.
In the Parameters modal, type: %1,%2 in the first field and then click Ok.
NOTE: No spaces between %1 and %2
Click Ok until you get back to the Global Objects modal. In the Properties panel, under the Data Source section, set the Validate Immediately field to True.
Click the List Source ellipsis.
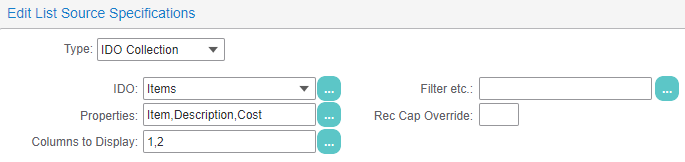
On the Edit List Source Specifications modal, from the drop down set the Type field to IDO Collection. For the IDO field, select Items and then click the Properties ellipsis.
On the Edit Property Specifications modal, use the Add button to add the Item, Description and Cost properties. Then click Ok.
Click the Columns to Display ellipsis and hold Shift to select Item and Description and click Ok.
Click Ok
Click Ok again to close the Global Objects modal.
From the Form, select the Item Combobox component.
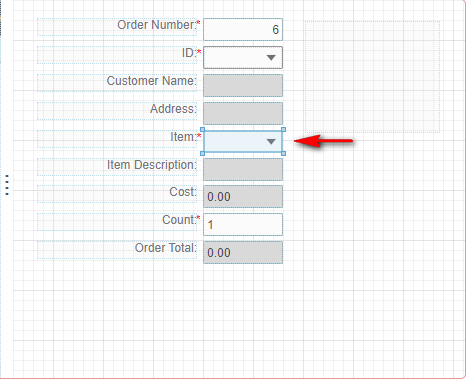
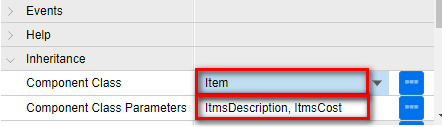
In the Properties panel, under the Inheritance section, set the Component Class field to Item.

In the Component Class Parameters field, type: ItmsDescription, ItmsCost.

NOTE: We will apply the same component class to the grid column.
Click the FormCollectionGrid component, and then click the Edit Grid Column(s) button in the top left corner.

In the Contained Components modal, select the ItemGridCol component. In the Properties panel, under Inheritance, set the Component Class field to Item.
In the Component Class Parameters field, type: ItmsDescription, ItmsCost.
Click Ok and Save.
Unload Global Form Objects in both Runtime mode and Design Mode. Form->Definition->Unload Global Form Objects.
Switch to back to the Runtime Mode tab and reopen the Orders form. Change the item on the form or in the grid to see the component class now populating the item Description and Cost immediately.
Select an item from the list and notice that the Item Description and Cost will immediately update.
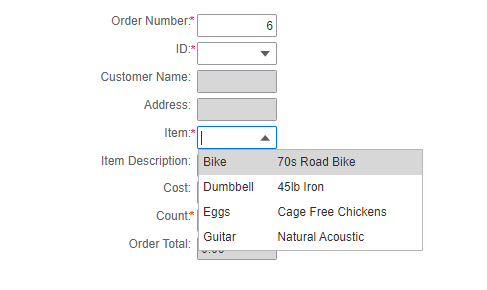
Test Grid column. Change the item and you’ll notice that the Item Description and Cost change here as well.
Summary:
We expanded on our orders facility by joining it with our items and customers tables, this allowed us to create join properties from those tables onto the orders IDO. We also created our first derived property which is an unbound sql expression used to perform calculations, sub queries or calls to sql functions, we use this to calculate our total order cost. We created right-click menus for drilling into the customers and items forms using property class extensions, these extensions will inherit anywhere that property class is being used. We introduce validators and how they can be used to not only validate the values of a component but to also set the customer name and address immediately upon data change and we followed that up by introducing component classes another type of global object that lets us bundle together sets of attributes this allowed us to package up our validator along with a list source into a reusable component class.
Here is the Part 5 video showing the detailed steps to complete the previous tasks.
What made this section helpful for you?
What made this section unhelpful for you?
On this page
- Table Joins & Interactive Extensions